Introduction
There’s something magical about s’mores—the crackling fire, the gooey marshmallows, the melty chocolate sandwiched between crisp graham crackers. But what if you could enjoy that classic campfire treat without needing a fire pit or perfect weather? Enter S’mores Bars, the easy, mess-free way to enjoy s’mores anytime, anywhere.
These decadent bars feature a buttery graham cracker crust, a double layer of rich chocolate, and a golden-toasted marshmallow topping that captures the essence of traditional s’mores in every bite. Whether you’re hosting a summer BBQ, packing lunchbox treats, or just craving a nostalgic dessert, these bars are guaranteed to satisfy.
In this ultimate guide, we’ll cover:
Why these bars are better than traditional s’mores
Step-by-step instructions for perfect results
Expert tips for customization
Make-ahead and storage solutions
Creative serving ideas
Let’s dive into the delicious details!
Why S’mores Bars Beat Traditional S’mores
While nothing can fully replace the experience of making s’mores over an open fire, these bars offer several unbeatable advantages:
1. No Campfire Required
- Perfect for apartment dwellers or rainy days
- No smoke, no burnt marshmallows, no sticky sticks
2. Uniformly Perfect Every Time
- Evenly toasted marshmallows (no charred spots)
- Consistent chocolate distribution
- No broken graham crackers
3. Easier to Serve a Crowd
- One batch makes 16-20 cleanly cut squares
- No assembly required—just grab and go
- Stacks neatly for parties and bake sales
4. Customizable
- Adjust chocolate types (dark, white, or flavored)
- Add mix-ins like peanut butter chips or caramel
- Make them gluten-free or vegan if needed
5. Better Texture
- Graham layer stays crisp (no sogginess)
- Marshmallows get lightly crispy outside while staying soft inside
- Chocolate stays perfectly melted
Step-by-Step Recipe Guide
Ingredients & Why They Matter
(Makes 16-20 bars in an 8×8″ pan)
| Ingredient | Purpose | Substitutions |
|---|---|---|
| Graham cracker crumbs | Provides the classic s’mores base texture | Digestive biscuits, gluten-free grahams |
| Butter | Binds the crust and adds richness | Coconut oil (vegan option) |
| Sugar | Enhances caramelization and crunch | Brown sugar for depth |
| Milk chocolate chips | Melts into that classic s’mores chocolate layer | Dark or semi-sweet chips |
| Semi-sweet chips | Balances sweetness with deeper chocolate flavor | Chopped chocolate bars |
| Mini marshmallows | Toast evenly and provide the perfect gooey-to-crispy ratio | Large marshmallows (halved) |
Detailed Instructions
1. Preparing the Crust (5 minutes active time)
- Preheat oven to 350°F (175°C) – This ensures even cooking.
- Line the pan with parchment – Leave overhang for easy removal.
- Mix dry ingredients – Combine graham crumbs and sugar.
- Add melted butter – Stir until mixture resembles wet sand.
- Press firmly into pan – Use a flat-bottomed cup for compactness.
Pro Tip: For extra flavor, add a pinch of cinnamon or espresso powder to the crust.
2. Layering the Chocolate (3 minutes)
- Milk chocolate chips first – These melt smoothly for that classic s’mores taste.
- Semi-sweet chips next – Adds complexity to balance the sweetness.
Science Note: The combination of milk and semi-sweet chocolate provides the ideal viscosity when melted—fluid enough to be gooey but stable enough to hold its shape when cooled.
3. Adding Marshmallows (2 minutes)
- Spread mini marshmallows evenly – They’ll expand as they toast.
- Press lightly – Helps them adhere to the chocolate.
Alternative Idea: For a “brookie” twist, layer marshmallows over brownie batter instead of graham crust.
4. Baking & Finishing (15-20 minutes)
- Bake until golden – Watch closely after 15 minutes.
- Optional broil – 30 seconds for extra toastiness (supervise carefully!).
- Cool completely – At least 1 hour for clean cuts.
Troubleshooting: If marshmallows brown too quickly, tent with foil.
Next-Level Variations
1. Flavor Twists
- Peanut Butter – Swirl ½ cup PB into the chocolate layer
- Salted Caramel – Drizzle ¼ cup caramel sauce before marshmallows
- Mint Chocolate – Add ½ tsp peppermint extract to the crust
2. Dietary Adaptations
| Dietary Need | Adjustment | Best Brands |
|---|---|---|
| Gluten-Free | Use GF graham crackers | Pamela’s, Kinnikinnick |
| Vegan | Vegan butter, dairy-free chocolate, Dandies marshmallows | Enjoy Life, Miyoko’s |
| Lower Sugar | Sugar-free chocolate chips, reduce crust sugar by half | Lily’s, ChocZero |
3. Presentation Upgrades
- Drizzle with chocolate – After cooling, melt extra chips and pipe designs
- Graham cracker crumb topping – Sprinkle on before baking for extra crunch
- Edible gold leaf – For fancy occasions
Science of Perfect S’mores Bars
Why This Recipe Works
- Graham Cracker Chemistry
- The 1.5:0.5:0.25 ratio (crumbs:butter:sugar) creates a crust that stays crisp yet sliceable.
- Butter coats the crumbs, preventing moisture absorption from the marshmallows.
- Chocolate Selection
- Milk chocolate (with its higher dairy content) melts smoothly.
- Semi-sweet chocolate (with more cocoa solids) provides structure.
- Marshmallow Physics
- Mini marshmallows toast more evenly than large ones.
- The oven’s dry heat creates a crisp exterior while keeping interiors soft.
Make-Ahead & Storage Guide
Timeline
| Stage | Room Temp | Refrigerated | Frozen |
|---|---|---|---|
| Unbaked crust | 2 hours | 2 days | 1 month |
| Assembled unbaked | Not recommended | 1 day | 2 weeks |
| Baked & cooled | 3 days | Not recommended | 1 month (thaw overnight) |
Reviving Leftovers
- Microwave – 5-10 seconds to restore gooeyness
- Oven – 5 minutes at 300°F to re-crisp the crust
Serving & Pairing Ideas
Occasion-Based Presentations
| Event | Serving Suggestion | Pairing |
|---|---|---|
| Kids’ Birthday | Cut into sticks with popsicle sticks | Chocolate milk |
| Wine & Dessert Night | Elegant triangles with berry compote | Cabernet Sauvignon |
| Summer Picnic | Individually wrapped in parchment | Iced coffee |
Creative Uses
- Ice Cream Topping – Crumble over vanilla bean
- Milkshake Mix-In – Blend with vanilla ice cream
- Hot Cocoa Garnish – Float a square on top
Frequently Asked Questions
Q: Can I use marshmallow fluff instead?
A: Yes, but spread a thin layer—it won’t toast the same way.
Q: Why did my chocolate seize?
A: Moisture from marshmallows may have dripped. Prevent by:
- Ensuring crust is fully cooled before adding chocolate
- Using chips (which have stabilizers) instead of chopped chocolate
Q: How do I get clean cuts?
A: Use a hot knife (dip in hot water, wipe dry between cuts).
Final Thoughts
These S’mores Bars are more than just a dessert—they’re a transportive experience that brings campfire nostalgia to your kitchen. With their perfect balance of textures and foolproof method, they’re destined to become a staple in your recipe collection.
Pro Tip: Double the recipe for a 9×13″ pan when feeding a crowd. The bars freeze beautifully, so you’ll always have a sweet treat on hand!
Print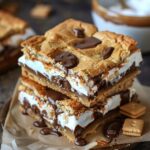
Ultimate S’mores Bars: The Perfect No-Campfire Treat
- Total Time: 40 mins
Description
Bring the campfire vibes indoors with these irresistible S’mores Bars! Layers of graham cracker crust, gooey marshmallows, and melty chocolate make for a delightful treat everyone will love.
Ingredients
1 1/2 cups graham cracker crumbs
1/2 cup unsalted butter, melted
1/4 cup granulated sugar
2 cups mini marshmallows
2 cups milk chocolate chips
1/2 cup semi-sweet chocolate chips
Instructions
Preheat your oven to 350°F (175°C). Line an 8×8-inch baking pan with parchment paper.
In a bowl, mix graham cracker crumbs, melted butter, and sugar until well combined. Press the mixture firmly into the bottom of the prepared pan to form the crust.
Sprinkle the milk chocolate chips evenly over the crust, followed by the mini marshmallows.
Top with the semi-sweet chocolate chips for extra chocolatey goodness.
Bake in the preheated oven for 15-20 minutes, or until the marshmallows are golden brown and the chocolate is melted.
Let the bars cool completely before cutting into squares.
Prep Time: 15 minutes