
Prepare to fall in love with the most irresistible mini chocolate peanut butter pies you’ve ever tasted! These decadent little treasures combine the timeless pairing of rich chocolate and creamy peanut butter in perfectly portioned individual servings. Moreover, they’re surprisingly easy to make and require no baking whatsoever.
Additionally, these miniature masterpieces are perfect for entertaining, special occasions, or whenever you need a show-stopping dessert. Furthermore, their individual serving size makes them ideal for parties where guests can grab and go without the mess of cutting larger pies.
Print
Mini Chocolate Peanut Butter Pies: The Ultimate Guide to Creating Bite-Sized Heaven
- Total Time: 2 hrs 30 mins
- Yield: 12 mini pies 1x
- Diet: Vegetarian
Description
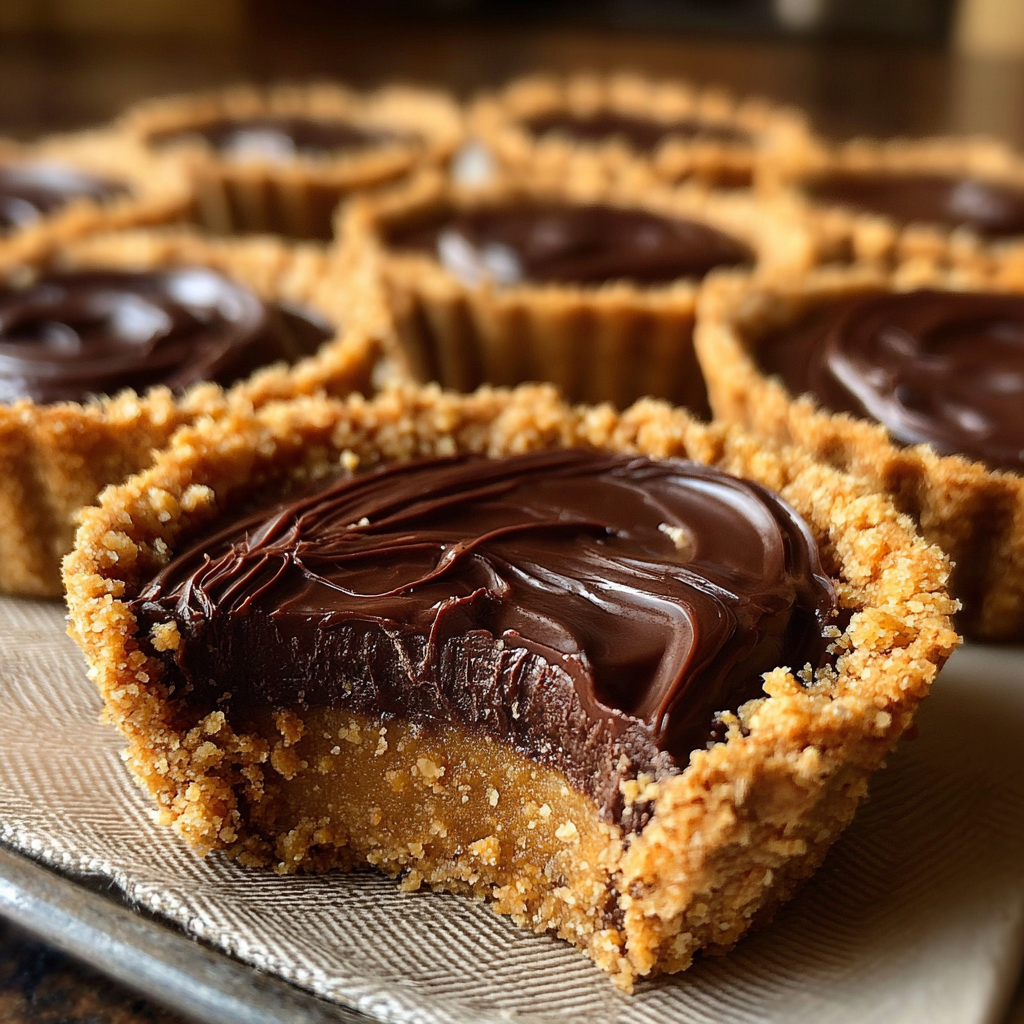
These Irresistible Mini Chocolate Peanut Butter Pies are the ultimate no-bake dessert! Featuring a smooth peanut butter filling layered over melted chocolate in a graham cracker crust, each mini pie delivers a rich and creamy bite of chocolate-peanut butter heaven. Perfect for parties, holidays, or anytime you want a sweet, crowd-pleasing treat.
Ingredients
- 1 package (8 oz) cream cheese, softened
- 1 cup creamy peanut butter
- 1 cup powdered sugar
- 1 teaspoon vanilla extract
- 1 cup heavy cream, whipped
- 1 cup semi-sweet chocolate chips, melted
- 12 mini graham cracker crusts (store-bought or homemade)
Instructions
- Make the filling: Beat cream cheese and peanut butter until smooth. Add powdered sugar and vanilla extract, and continue to mix until fully combined.
- Fold in cream: Gently fold whipped cream into the peanut butter mixture until smooth and airy. Set aside.
- Melt the chocolate: Melt chocolate chips in a microwave-safe bowl in 30-second intervals, stirring until smooth. Let cool slightly.
- Layer the crusts: Spoon a tablespoon of melted chocolate into each mini graham cracker crust, spreading to cover the bottom.
- Add the filling: Spoon the peanut butter mixture into each crust, smoothing the tops.
- Chill: Refrigerate pies for at least 2 hours until set.
- Garnish and serve: Top with whipped cream, chocolate shavings, or chopped peanuts if desired. Serve chilled.
Notes
- Peanut butter variation: Use crunchy peanut butter for extra texture.
- Make-ahead tip: These pies can be made 1 day in advance and stored in the fridge.
- Storage: Keep refrigerated in an airtight container for up to 3 days.
- Prep Time: 30 mins
- Cook Time: undefined
- Category: Dessert
- Method: No-Bake
- Cuisine: American
Nutrition
- Serving Size: 1 mini pie
- Calories: 300 kcal
- Sugar: 20 g
- Sodium: 140 mg
- Fat: 22 g
- Saturated Fat: undefined
- Unsaturated Fat: undefined
- Trans Fat: undefined
- Carbohydrates: 22 g
- Fiber: 2 g
- Protein: 6 g
- Cholesterol: 35 mg
Keywords: mini pies, chocolate peanut butter, no-bake dessert, bite-sized treat, graham cracker crust
Why You’ll Love These Mini Chocolate Peanut Butter Pies
These delightful desserts offer numerous advantages that make them a standout choice for any sweet occasion. Moreover, they combine convenience with gourmet flavors in ways that will impress even the most discerning dessert lovers.
• No-Bake Convenience: Ready in just 30 minutes of active preparation time • Perfect Portion Control: Individual servings eliminate guesswork and overeating • Make-Ahead Friendly: Prepare hours or even days in advance for stress-free entertaining • Universally Loved Flavors: Chocolate and peanut butter appeal to almost everyone • Professional Presentation: Individual pies look elegant and sophisticated • Customizable Toppings: Easy to personalize with various garnishes and decorations • Budget-Friendly: Uses affordable ingredients that deliver premium results
Furthermore, these pies are incredibly versatile and adaptable to different dietary preferences. Additionally, the no-bake preparation means your kitchen stays cool during hot summer months. Moreover, they’re sturdy enough for transport to potlucks and gatherings without falling apart.
The combination of textures also makes these pies irresistible. For instance, the crunchy graham cracker crust contrasts beautifully with the smooth chocolate layer and fluffy peanut butter filling. Similarly, each bite delivers the perfect balance of sweet and slightly salty flavors.
Essential Ingredients for Perfect Mini Chocolate Peanut Butter Pies
Creating exceptional mini pies starts with selecting quality ingredients that work harmoniously together. Each component plays a crucial role in delivering the perfect balance of flavors and textures.
Cream Cheese: Use full-fat cream cheese that’s completely softened for the smoothest texture. Moreover, softened cream cheese blends more easily and prevents lumps in the filling. Additionally, avoid low-fat versions which can affect both taste and consistency.
Creamy Peanut Butter: Choose a high-quality brand with natural oils for the best flavor. Furthermore, avoid natural peanut butters that separate, as they can make the filling unstable. Additionally, room temperature peanut butter incorporates more easily into the mixture.
Powdered Sugar: Also called confectioner’s sugar, this dissolves completely and creates silky smooth texture. Moreover, it provides sweetness without grittiness that granulated sugar might cause. Additionally, sift it if you notice any lumps before adding.
Heavy Cream: Must be cold and fresh for proper whipping into stable peaks. Furthermore, heavy cream with at least 35% fat content whips best and holds its shape. Additionally, over-whipped cream can turn to butter, so watch carefully.
Semi-Sweet Chocolate Chips: Choose quality chocolate chips that melt smoothly without seizing. Moreover, semi-sweet provides the perfect balance of sweetness and chocolate intensity. Additionally, you can substitute with chopped chocolate bars for even better quality.
Mini Graham Cracker Crusts: Store-bought crusts save time and ensure consistent results. However, homemade crusts offer superior flavor if you have extra time. Furthermore, look for crusts that aren’t cracked or broken for best presentation.
Step-by-Step Guide to Making Mini Chocolate Peanut Butter Pies
Creating these delectable desserts involves careful attention to texture and timing. Moreover, following these detailed steps ensures professional-quality results every time.
Step 1: Preparing the Peanut Butter Filling
Begin by ensuring your cream cheese is completely softened to room temperature. Additionally, cold cream cheese will create lumps that are difficult to smooth out later. Furthermore, you can speed softening by cutting it into small cubes.
In a large mixing bowl, combine softened cream cheese and peanut butter using an electric mixer. Moreover, beat on medium speed until the mixture is completely smooth and creamy. Additionally, scrape down the bowl sides frequently to ensure even mixing.
Gradually add powdered sugar, starting with half the amount and beating well before adding the remainder. Furthermore, this prevents sugar clouds and ensures smooth incorporation. Additionally, add vanilla extract and beat until everything is perfectly combined.
The mixture should be light, fluffy, and completely smooth at this point. Moreover, taste and adjust sweetness if desired by adding more powdered sugar. Additionally, the filling should hold its shape when spooned but still be creamy.
Step 2: Whipping and Folding the Cream
In a separate chilled bowl, whip heavy cream until soft peaks form. Additionally, be careful not to over-whip, as this can cause the cream to become grainy. Furthermore, stop as soon as the cream holds its shape when the beaters are lifted.
Gently fold the whipped cream into the peanut butter mixture using a rubber spatula. Moreover, use a folding motion rather than stirring to maintain the light, airy texture. Additionally, fold just until no white streaks remain visible.
The finished filling should be light, fluffy, and hold its shape when spooned. Furthermore, it should have a mousse-like consistency that’s not too dense or too loose. Additionally, refrigerate the filling while preparing the chocolate layer.
Step 3: Preparing the Chocolate Layer
Melt chocolate chips using your preferred method, either microwave or double boiler. Additionally, if using microwave, heat in 30-second intervals, stirring between each interval. Furthermore, chocolate can burn easily, so proceed slowly and carefully.
For double boiler method, place chocolate in a heatproof bowl over simmering water. Moreover, ensure the bottom of the bowl doesn’t touch the water. Additionally, stir frequently until chocolate is completely smooth and melted.
Allow melted chocolate to cool slightly before using, but not so much that it hardens. Furthermore, slightly warm chocolate spreads more easily and creates a smoother layer. Additionally, test temperature on your wrist – it should feel warm but not hot.
Step 4: Assembling the Mini Pies
Place mini graham cracker crusts on a baking sheet or tray for easy handling. Additionally, this makes it easier to move them to the refrigerator later. Furthermore, arrange them so they’re not touching each other.
Spoon about one tablespoon of melted chocolate into each crust. Moreover, use the back of a spoon to spread chocolate evenly across the bottom. Additionally, bring chocolate slightly up the sides for better coverage and presentation.
Allow chocolate layer to set for 5-10 minutes before adding the peanut butter filling. Furthermore, this prevents the layers from mixing together. Additionally, the chocolate should be firm but not completely hard.
Divide peanut butter filling evenly among the crusts, using an ice cream scoop or large spoon. Moreover, smooth the tops with the back of a spoon for professional appearance. Additionally, fill each crust generously but avoid overfilling.
Step 5: Chilling and Final Touches
Refrigerate assembled pies for at least 2 hours, or until completely set. Additionally, overnight chilling produces the best texture and allows flavors to meld. Furthermore, cover loosely with plastic wrap to prevent absorption of refrigerator odors.
Before serving, consider adding optional garnishes like whipped cream rosettes, chocolate shavings, or chopped peanuts. Moreover, these additions enhance both appearance and flavor. Additionally, garnish just before serving to maintain freshness.
Remove pies from refrigerator 5-10 minutes before serving for optimal texture. Furthermore, this slight warming makes them easier to eat and enhances flavor. Additionally, they should still be chilled but not rock-hard.
Creative Variations for Mini Chocolate Peanut Butter Pies
These versatile desserts adapt beautifully to different flavor profiles and dietary preferences. Moreover, experimenting with variations keeps dessert time exciting and fresh.
Chocolate Crust Variation: Use chocolate graham cracker crusts or crushed Oreo cookie crusts for extra chocolate intensity. Additionally, this creates a more decadent dessert for serious chocolate lovers. Furthermore, the darker crust provides beautiful visual contrast.
White Chocolate Peanut Butter Pies: Substitute white chocolate chips for semi-sweet chocolate for a sweeter, milder flavor. Moreover, white chocolate pairs beautifully with peanut butter without competing flavors. Additionally, this variation looks elegant and sophisticated.
Salted Caramel Addition: Drizzle salted caramel sauce over the chocolate layer before adding peanut butter filling. Furthermore, the sweet-salty combination enhances both chocolate and peanut butter flavors. Additionally, reserve some caramel for garnishing the tops.
Crunchy Peanut Butter Version: Use crunchy peanut butter instead of smooth for added texture throughout. Moreover, the peanut pieces provide interesting textural contrast in every bite. Additionally, garnish with whole roasted peanuts for extra crunch.
Banana Chocolate Peanut Butter Pies: Layer thin banana slices over the chocolate before adding peanut butter filling. Furthermore, bananas complement both chocolate and peanut butter perfectly. Additionally, this combination evokes beloved Elvis sandwich flavors.
Expert Tips for Perfect Mini Chocolate Peanut Butter Pies
Professional techniques can elevate your desserts from good to extraordinary. Moreover, these insider secrets ensure consistent, bakery-quality results every time you make them.
Temperature Matters: Ensure all ingredients are at proper temperature before beginning. Additionally, room temperature ingredients blend more easily and create smoother textures. Furthermore, cold heavy cream whips better than room temperature cream.
Prevent Grainy Filling: Sift powdered sugar before adding to prevent lumps in the final product. Moreover, beat cream cheese thoroughly before adding other ingredients. Additionally, scrape bowl sides frequently during mixing.
Chocolate Tempering: Let melted chocolate cool slightly before using to prevent it from melting the filling. Furthermore, properly tempered chocolate creates a stable layer that won’t crack. Additionally, stirring melted chocolate frequently prevents hot spots.
Even Distribution: Use an ice cream scoop or measuring cup to ensure equal portions in each crust. Moreover, consistent portions create professional presentation and ensure everyone gets the same experience. Additionally, level the tops with an offset spatula.
Proper Chilling: Allow adequate chilling time for best texture and easy serving. Furthermore, rushing the chilling process results in soft, messy pies. Additionally, well-chilled pies slice cleanly and maintain their shape.
Common Mistakes to Avoid When Making Mini Chocolate Peanut Butter Pies
Learning from common errors saves time, ingredients, and frustration during your pie-making journey. Moreover, understanding these pitfalls helps ensure successful results from your first attempt.
Using Cold Cream Cheese: Cold cream cheese creates lumps that are nearly impossible to smooth out completely. Additionally, it requires excessive beating which can break down the mixture. Furthermore, plan ahead and let cream cheese soften naturally at room temperature.
Over-Whipping Cream: Whipped cream can quickly turn to butter if beaten too long. Moreover, over-whipped cream loses its light, airy texture and becomes grainy. Additionally, stop beating as soon as soft peaks form and hold their shape.
Adding Hot Chocolate: Hot melted chocolate will melt the whipped cream and ruin the filling texture. Furthermore, it can also melt the graham cracker crust. Additionally, always let chocolate cool to warm room temperature before using.
Insufficient Chilling Time: Rushing the chilling process results in soft, unstable pies that don’t hold their shape. Moreover, properly chilled pies are easier to serve and eat. Additionally, overnight chilling produces the best texture and flavor development.
Overfilling the Crusts: Too much filling can overflow and create messy presentation. Furthermore, overfilled pies are difficult to eat neatly. Additionally, proper portioning ensures each pie looks professional and appetizing.
Nutritional Information and Health Considerations
While these pies are definitely an indulgent treat, understanding their nutritional profile helps you enjoy them mindfully. Moreover, being aware of ingredients allows for informed dietary choices.
Calorie Content: Each mini pie contains approximately 300 calories, making portion control easier than large pies. Additionally, the individual serving size naturally limits consumption. Furthermore, this allows you to satisfy cravings without excessive indulgence.
Protein Benefits: Peanut butter and cream cheese provide protein that helps stabilize blood sugar levels. Moreover, protein increases satiety and prevents rapid hunger return. Additionally, this makes the dessert more satisfying than purely sugar-based treats.
Healthy Fats: Peanut butter contains monounsaturated fats that support heart health when consumed in moderation. Furthermore, these healthy fats help with nutrient absorption. Additionally, they contribute to the satisfying mouthfeel of the dessert.
Calcium Source: Cream cheese and heavy cream provide calcium for bone health. Moreover, dairy products also supply vitamin A and other essential nutrients. Additionally, these nutrients support overall health when part of a balanced diet.
Moderation Key: Like all desserts, these pies are best enjoyed occasionally as part of a balanced diet. Furthermore, their rich nature means a little goes a long way in satisfaction. Additionally, savoring each bite mindfully enhances the experience.
Equipment Needed for Making Mini Chocolate Peanut Butter Pies
Having the right tools makes pie preparation more efficient and enjoyable. Moreover, most equipment serves multiple purposes in your kitchen arsenal.
Electric Mixer: Essential for achieving smooth, lump-free cream cheese mixture and properly whipped cream. Additionally, hand mixers work fine, though stand mixers are more convenient. Furthermore, proper mixing creates the light, airy texture that makes these pies special.
Large Mixing Bowls: Multiple bowls allow you to prepare different components simultaneously. Moreover, glass or stainless steel bowls work best for temperature-sensitive preparations. Additionally, having various sizes gives you flexibility during preparation.
Rubber Spatula: Crucial for folding whipped cream into peanut butter mixture without deflating. Furthermore, flexible spatulas help scrape bowl sides clean. Additionally, heat-resistant spatulas work for both mixing and chocolate melting.
Ice Cream Scoop: Ensures consistent portion sizes and professional presentation. Moreover, a #20 or #24 scoop works perfectly for mini pie portions. Additionally, this tool speeds up the filling process significantly.
Baking Sheet: Provides stable platform for transporting assembled pies to refrigerator. Furthermore, rimmed sheets prevent accidents during transport. Additionally, line with parchment paper for easy cleanup.
Storage and Make-Ahead Tips
Proper planning and storage techniques allow you to enjoy these pies more frequently with less stress. Moreover, make-ahead capabilities make them perfect for entertaining.
Advance Preparation: These pies can be made up to 2 days ahead and stored covered in refrigerator. Additionally, flavors actually improve after overnight chilling. Furthermore, advance preparation reduces party-day stress significantly.
Proper Storage: Cover assembled pies loosely with plastic wrap to prevent drying out and odor absorption. Moreover, store in refrigerator’s main compartment for consistent temperature. Additionally, avoid storing near strong-smelling foods.
Freezing Options: Assembled pies freeze well for up to 1 month when properly wrapped. Furthermore, thaw in refrigerator overnight before serving. Additionally, garnish after thawing for best appearance and texture.
Component Make-Ahead: Prepare peanut butter filling up to 3 days in advance and store covered. Moreover, chocolate layer can be prepared and stored at room temperature. Additionally, assemble components on serving day for optimal freshness.
Transport Tips: These pies travel well when kept chilled and covered. Furthermore, use a shallow container with tight lid for best protection. Additionally, bring garnishes separately to add just before serving.
Serving Suggestions for Mini Chocolate Peanut Butter Pies
Thoughtful presentation and accompaniments can transform these already impressive desserts into memorable experiences. Moreover, the right styling elevates them from simple treats to elegant desserts.
Elegant Presentations: Arrange pies on tiered serving stands for dramatic height and visual impact. Additionally, use doilies or decorative plates to enhance sophistication. Furthermore, consistent garnishing creates professional bakery appearance.
Garnish Options: Top with dollops of whipped cream, chocolate curls, or chopped roasted peanuts for added appeal. Moreover, drizzle with chocolate or caramel sauce just before serving. Additionally, fresh berries provide color contrast and slight tartness.
Beverage Pairings: Serve with coffee, espresso, or cold milk to complement rich flavors. Furthermore, dessert wines or port create sophisticated adult pairings. Additionally, hot chocolate makes cozy winter presentations.
Seasonal Styling: Add seasonal elements like fall leaves, spring flowers, or holiday decorations around serving platters. Moreover, colored garnishes can reflect seasonal themes. Additionally, themed serving pieces enhance special occasion presentations.
Individual Presentation: Serve each pie on its own small dessert plate with appropriate utensils. Furthermore, cloth napkins add elegance to the dining experience. Additionally, this presentation works well for formal dinner parties.
Troubleshooting Your Mini Chocolate Peanut Butter Pies
Even experienced bakers occasionally encounter challenges when making these desserts. However, most issues have straightforward solutions that improve results immediately.
Lumpy Filling: Usually caused by cold cream cheese or insufficient mixing. Additionally, strain the mixture through fine-mesh sieve to remove lumps. Furthermore, next time ensure cream cheese is completely softened before beginning.
Runny Consistency: Often results from over-whipped cream that has broken or insufficient chilling time. Moreover, try folding in additional whipped cream if mixture is too loose. Additionally, extended chilling usually firms up slightly runny fillings.
Chocolate Won’t Spread: Chocolate may be too cool or too thick for easy spreading. Furthermore, gently rewarm chocolate or thin with small amount of neutral oil. Additionally, work quickly while chocolate is still workable.
Soggy Crusts: Excess moisture in filling or inadequate chocolate barrier can cause sogginess. Moreover, ensure chocolate layer covers bottom completely. Additionally, drain any excess liquid from ingredients before using.
Cracks in Chocolate: Temperature shock or overly thick chocolate layer can cause cracking. Furthermore, this is purely cosmetic and doesn’t affect taste. Additionally, garnish strategically to hide any imperfections.
FAQs About Mini Chocolate Peanut Butter Pies
Q: Can I use natural peanut butter instead of regular peanut butter? A: Natural peanut butter can work but may affect texture since it contains less stabilizers. Additionally, stir it thoroughly and drain excess oil before using. Furthermore, the filling may be slightly less stable with natural varieties.
Q: How can I make these mini pies dairy-free? A: Substitute dairy-free cream cheese and use coconut cream instead of heavy cream. Moreover, ensure your chocolate chips are dairy-free as well. Additionally, the texture may be slightly different but still delicious.
Q: Can I make larger versions of these pies? A: Absolutely! Use regular-sized graham cracker crusts and increase ingredients proportionally. Furthermore, larger pies may need longer chilling time to set properly. Additionally, cut into slices for serving rather than individual portions.
Q: What’s the best way to crush graham crackers for homemade crusts? A: Place crackers in sealed plastic bag and crush with rolling pin for control over texture. Moreover, food processor works well for uniform crumbs. Additionally, mix crumbs with melted butter and press into mini tart pans.
Q: Can I substitute the chocolate layer with something else? A: Try caramel, fruit preserves, or even Nutella for different flavor profiles. Furthermore, ensure whatever you use will set firm enough to support the filling. Additionally, taste combinations beforehand to ensure compatibility.
Q: How do I prevent the chocolate from cracking when chilled? A: Let chocolate cool to room temperature before refrigerating and avoid extreme temperature changes. Moreover, slightly thinner chocolate layers are less prone to cracking. Additionally, any small cracks can be hidden with garnishes.
Q: Can I make these pies without the chocolate layer? A: Certainly! The peanut butter filling is delicious on its own in graham cracker crusts. Furthermore, you might want to add extra vanilla or a touch of honey for enhanced flavor. Additionally, consider different garnish options to add visual interest.
Special Occasion Variations
These versatile pies can be adapted for holidays and special celebrations throughout the year. Moreover, themed variations make them perfect for any festive gathering.
Holiday Themes: Add peppermint extract and crushed candy canes for Christmas versions. Furthermore, use orange-tinted filling for Halloween celebrations. Additionally, red and pink garnishes work beautifully for Valentine’s Day.
Birthday Celebrations: Incorporate birthday cake flavoring and colorful sprinkles into the filling. Moreover, top with small birthday candles for individual celebration pies. Additionally, use funfetti-style additions for festive appearance.
Summer Variations: Add fresh berry layers or tropical fruit garnishes for seasonal appeal. Furthermore, coconut flakes and lime zest create refreshing summer flavors. Additionally, lighter garnishes work well for warm weather entertaining.
Elegant Entertaining: Use gold leaf, edible flowers, or gourmet chocolate decorations for sophisticated presentations. Moreover, these additions transform simple pies into luxury desserts. Additionally, premium ingredients elevate the entire experience.
Conclusion
These mini chocolate peanut butter pies represent the perfect marriage of convenience, flavor, and elegance in dessert form. Moreover, they prove that impressive desserts don’t require complicated techniques or hours of preparation time. Additionally, their individual serving size makes them ideal for any gathering, from intimate dinners to large celebrations.
The combination of rich chocolate, creamy peanut butter, and fluffy texture creates an irresistible dessert experience. Furthermore, their make-ahead nature eliminates stress from entertaining while ensuring you always have an impressive dessert ready. Moreover, the endless variation possibilities mean you’ll never get bored with this recipe.


Your pictures do not reflect the directions. The pics show the chocolate on top but your directions state to put the chocolate on the crust, then the peanut butter mixture on top of that. Please state the correct directions or put the correct pics on your blog. I won’t make recipes that are deceiving.
Okey I will put