Summer calls for refreshing treats that cool you down and satisfy your sweet tooth. Moreover, nothing beats a dessert that’s both impressive and incredibly easy to make. Ice cream sandwich cake delivers exactly that – a show-stopping frozen treat that requires no baking skills whatsoever. Additionally, this delightful dessert combines the nostalgic charm of ice cream sandwiches with the elegance of a layered cake.
Furthermore, this no-bake wonder transforms simple store-bought ingredients into something truly spectacular. The beauty lies in its simplicity – just layer, drizzle, and freeze. In fact, you can have this gorgeous dessert ready in just 20 minutes of prep time. However, the real magic happens during the freezing process, where all the flavors meld together perfectly.
Print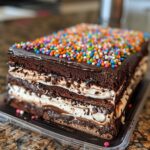
Ice Cream Sandwich Cake: The Ultimate Summer Dessert Guide
- Total Time: 4 hours 20 minutes (including freeze time)
- Yield: 12 servings
- Diet: Vegetarian
Description
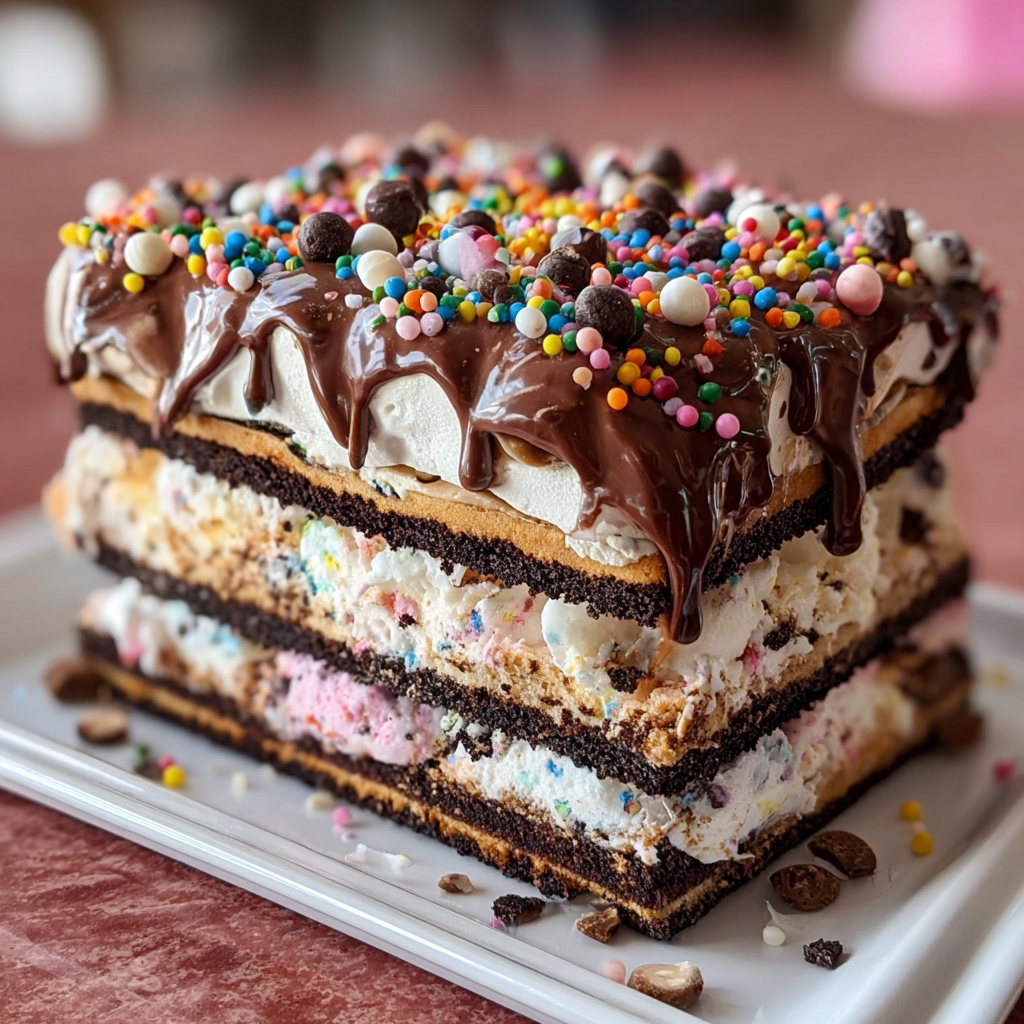
Indulge in the ultimate summer treat with this easy-to-make Ice Cream Sandwich Cake! Layers of creamy ice cream sandwiches, chocolate sauce, and whipped cream create a deliciously refreshing dessert that’s perfect for any occasion.
Ingredients
– 24 ice cream sandwiches – 1 cup chocolate sauce – 2 cups whipped cream or whipped topping – Optional toppings: sprinkles, crushed cookies, chocolate chips
Instructions
1. Arrange 12 ice cream sandwiches in a 9×13-inch baking dish, trimming to fit if needed. 2. Drizzle half the chocolate sauce over the first layer. 3. Spread 1 cup whipped cream over the chocolate layer. 4. Repeat with remaining ice cream sandwiches, chocolate sauce, and whipped cream. 5. Optional: Add sprinkles, crushed cookies, or chocolate chips on top. 6. Cover with plastic wrap and freeze for at least 4 hours or overnight until firm. 7. Slice and serve chilled. Enjoy!
Notes
Customize with different flavors of ice cream sandwiches, or add caramel or fudge sauce between layers for extra richness.
- Prep Time: 20 minutes
- Cook Time: 0 minutes
- Category: Dessert
- Method: No-Bake
- Cuisine: American
Nutrition
- Serving Size: 1 slice (1/12th of cake)
- Calories: Varies based on brands and toppings
- Sugar: N/A
- Sodium: N/A
- Fat: N/A
- Saturated Fat: N/A
- Unsaturated Fat: N/A
- Trans Fat: N/A
- Carbohydrates: N/A
- Fiber: N/A
- Protein: N/A
- Cholesterol: N/A
Keywords: ice cream sandwich cake, no-bake dessert, summer treat, frozen dessert, whipped cream
Why You’ll Love This Ice Cream Sandwich Cake
Creating the perfect summer dessert doesn’t have to be complicated. Additionally, this ice cream sandwich cake offers numerous benefits that make it a crowd favorite:
• It’s incredibly easy to make: Perfect for beginners and experienced bakers alike. Moreover, no special equipment or techniques are required.
• It’s highly customizable: You can mix and match different ice cream sandwich flavors. Furthermore, endless topping possibilities let you personalize each creation.
• It’s a real crowd-pleaser: Great for family gatherings, birthday parties, or summer barbecues. Additionally, both kids and adults absolutely love it.
• It’s budget-friendly: Uses affordable, readily available ingredients. Plus, you can easily scale the recipe up or down based on your needs.
• It’s make-ahead friendly: Prepare it hours or even days in advance. Consequently, you’ll have more time to enjoy your guests.
• It’s visually stunning: The layered appearance always impresses guests. Furthermore, the colorful presentation makes it perfect for Instagram-worthy photos.
Essential Ingredients for Perfect Ice Cream Sandwich Cake
Success starts with choosing the right ingredients. Moreover, quality ingredients make a significant difference in the final result. Here’s what you’ll need for this amazing dessert:
Primary Ingredients
Ice Cream Sandwiches (24 pieces): These form the foundation of your cake. Additionally, choose high-quality sandwiches for the best texture and flavor. Furthermore, consider mixing different flavors for added interest.
Chocolate Sauce (1 cup): This adds rich, decadent flavor between layers. Moreover, you can use store-bought or homemade chocolate sauce. Alternatively, try caramel or strawberry sauce for variety.
Whipped Cream (2 cups): Creates light, airy layers that balance the dense ice cream. Additionally, both homemade whipped cream and store-bought topping work perfectly.
Optional Toppings
Sprinkles: Add color and fun to your creation. Furthermore, choose colors that match your party theme.
Crushed Cookies: Provide delightful texture contrast. Additionally, Oreos, graham crackers, or chocolate chip cookies work wonderfully.
Chocolate Chips: Offer extra chocolatey goodness. Moreover, mini chips distribute more evenly than regular-sized ones.
Step-by-Step Guide to Making Ice Cream Sandwich Cake
Creating this masterpiece is surprisingly straightforward. However, following these detailed steps ensures perfect results every time.
Step 1: Preparation and Setup
Begin by gathering all your ingredients and equipment. Additionally, make sure your 9×13-inch baking dish is clean and dry. Furthermore, have your plastic wrap ready for covering the finished cake.
Remove the ice cream sandwiches from the freezer about 5 minutes before assembly. However, don’t let them get too soft, as they’ll be harder to work with. Moreover, slightly softened sandwiches are easier to trim and arrange.
Prepare your workspace by laying out all toppings and sauces. Additionally, have a sharp knife ready for trimming sandwiches to fit your dish. Furthermore, keep a clean kitchen towel nearby for wiping your hands.
Step 2: Creating the First Layer
Start by arranging 12 ice cream sandwiches in your baking dish. Additionally, fit them snugly together to minimize gaps. Furthermore, trim any sandwiches as needed to ensure a perfect fit.
Press the sandwiches gently to create an even surface. However, avoid pressing too hard, as this can compress the ice cream. Moreover, a level first layer ensures stability for subsequent layers.
Next, drizzle half of your chocolate sauce evenly over the sandwiches. Additionally, use a spoon to spread it if needed. Furthermore, make sure the sauce reaches all corners of the dish.
Step 3: Adding the Whipped Cream Layer
Carefully spread 1 cup of whipped cream over the chocolate sauce. Additionally, use a spatula to create smooth, even coverage. Furthermore, work gently to avoid disturbing the layer beneath.
Ensure the whipped cream reaches all edges of the dish. Moreover, this layer acts as a barrier between the chocolate sauce and the next layer of sandwiches. Additionally, a smooth whipped cream layer creates a more professional appearance.
Step 4: Completing the Second Layer
Repeat the process with the remaining 12 ice cream sandwiches. Additionally, arrange them just as carefully as the first layer. Furthermore, ensure they’re aligned properly for easy slicing later.
Apply the remaining chocolate sauce over this second layer. Moreover, distribute it evenly for consistent flavor in every bite. Additionally, take time to reach all corners and edges.
Finally, spread the remaining whipped cream on top. Furthermore, create an attractive, smooth surface that will showcase your toppings beautifully. Additionally, use decorative swirls if desired for extra visual appeal.
Step 5: Final Assembly and Decoration
Now comes the fun part – adding your chosen toppings. Additionally, sprinkle them evenly across the surface. Furthermore, press lightly to help them adhere to the whipped cream.
Consider creating patterns or designs with different toppings. Moreover, alternating colors or textures creates visual interest. Additionally, leave some areas plain for guests who prefer simpler flavors.
Cover the entire cake tightly with plastic wrap. Furthermore, ensure the wrap doesn’t touch the surface to avoid disturbing your beautiful toppings. Additionally, press the wrap against the dish edges for a secure seal.
Freezing and Storage Tips for Ice Cream Sandwich Cake
Proper freezing is crucial for achieving the perfect texture. Additionally, patience during this step ensures the best results.
Freezing Guidelines
Freeze the assembled cake for at least 4 hours. However, overnight freezing produces even better results. Moreover, the longer freezing time allows flavors to meld beautifully.
During freezing, avoid opening the freezer door frequently. Additionally, temperature fluctuations can affect the cake’s texture. Furthermore, place the cake on a stable freezer shelf away from the door.
Storage Best Practices
Well-wrapped ice cream sandwich cake keeps for up to one week. Additionally, the plastic wrap prevents freezer burn and maintains freshness. However, for best quality, consume within 3-4 days.
Store leftover slices in individual containers or wrap them separately. Moreover, this prevents the cake from absorbing other freezer odors. Additionally, individual portions are convenient for quick treats.
Creative Variations of Ice Cream Sandwich Cake
Experimentation leads to exciting new flavor combinations. Additionally, these variations keep the dessert fresh and interesting.
Flavor Combinations
Cookies and Cream Delight: Use chocolate ice cream sandwiches with crushed Oreos. Additionally, add white chocolate sauce for contrast. Furthermore, top with chocolate cookie crumbs.
Strawberry Shortcake Style: Combine vanilla sandwiches with strawberry sauce. Moreover, add fresh strawberry slices between layers. Additionally, finish with graham cracker crumbs.
Peanut Butter Paradise: Layer chocolate sandwiches with peanut butter sauce. Furthermore, add crushed peanut butter cups as topping. Additionally, drizzle with melted peanut butter.
Seasonal Adaptations
Holiday Themed: Use red and green sprinkles for Christmas. Additionally, add crushed candy canes for extra festive flavor. Furthermore, consider peppermint ice cream sandwiches.
Summer Berry Blast: Incorporate fresh berries between layers. Moreover, use berry-flavored sauces instead of chocolate. Additionally, garnish with mint leaves for freshness.
Troubleshooting Common Ice Cream Sandwich Cake Issues
Even simple recipes can present challenges. However, these solutions help you overcome common problems.
Texture Problems
Sandwiches Too Soft: Work quickly and return to freezer if needed. Additionally, choose a cooler room temperature for assembly. Furthermore, pre-chill your baking dish.
Layers Sliding: Ensure each layer is level before adding the next. Moreover, press gently to create stability. Additionally, avoid over-softening the sandwiches.
Presentation Issues
Uneven Sauce Distribution: Use a spoon to spread sauce evenly. Additionally, warm the sauce slightly for easier spreading. Furthermore, work in small sections for better control.
Messy Slicing: Use a sharp knife warmed under hot water. Moreover, clean the knife between cuts. Additionally, let the cake soften slightly before slicing.
Serving Suggestions for Ice Cream Sandwich Cake
Presentation elevates this simple dessert into something special. Additionally, thoughtful serving enhances the overall experience.
Cutting and Plating
Use a sharp, warm knife for clean cuts. Additionally, wipe the blade between slices for neat presentation. Furthermore, slice just before serving to maintain shape.
Serve on chilled plates for best results. Moreover, this prevents melting and maintains the cake’s structure. Additionally, garnish individual plates with extra toppings.
Accompaniments
Fresh Fruit: Berries complement the rich flavors beautifully. Additionally, fruit adds color and nutritional value. Furthermore, seasonal fruits create variety.
Extra Sauces: Offer additional chocolate or caramel sauce on the side. Moreover, this allows guests to customize their portions. Additionally, fruit sauces provide lighter options.
Nutritional Considerations for Ice Cream Sandwich Cake
Understanding the nutritional aspects helps you make informed choices. Additionally, simple modifications can make this treat more balanced.
Caloric Content
The calorie count varies significantly based on ingredients chosen. Additionally, portion size greatly affects the nutritional impact. Furthermore, homemade versions often contain fewer preservatives.
Healthier Alternatives
Reduced-Fat Options: Choose low-fat ice cream sandwiches and whipped topping. Additionally, use sugar-free chocolate sauce. Furthermore, add fresh fruit for natural sweetness.
Portion Control: Cut smaller pieces and serve with fresh fruit. Moreover, this satisfies the sweet craving without overindulging. Additionally, smaller portions allow for more variety.
Make-Ahead Tips for Ice Cream Sandwich Cake
Planning ahead makes entertaining much easier. Additionally, this dessert is perfect for advance preparation.
Preparation Timeline
Day Before: Assemble the entire cake and freeze overnight. Additionally, prepare any homemade toppings. Furthermore, this allows flavors to develop fully.
Week Before: Purchase all ingredients and store properly. Moreover, this ensures everything is ready when needed. Additionally, check expiration dates on all items.
Assembly Shortcuts
Batch Assembly: Make multiple cakes when entertaining large groups. Additionally, use different flavor combinations for variety. Furthermore, label each cake clearly.
Topping Stations: Set up a topping bar for guests to customize. Moreover, this adds interactive fun to the dessert. Additionally, it accommodates different preferences easily.
FAQs About Ice Cream Sandwich Cake
Q: Can I use different flavors of ice cream sandwiches? A: Absolutely! Additionally, mixing flavors creates exciting taste combinations. Furthermore, consider complementary flavors like vanilla and chocolate or strawberry and vanilla.
Q: How long does ice cream sandwich cake last in the freezer? A: Properly stored, it lasts up to one week. However, for best quality, consume within 3-4 days. Moreover, wrap tightly to prevent freezer burn.
Q: Can I make this cake dairy-free? A: Yes, use dairy-free ice cream sandwiches and coconut whipped cream. Additionally, check that your chocolate sauce is dairy-free. Furthermore, many plant-based alternatives work excellently.
Q: What size dish should I use for ice cream sandwich cake? A: A 9×13-inch dish works perfectly for this recipe. Additionally, this size accommodates 24 sandwiches comfortably. Furthermore, deeper dishes can accommodate extra layers.
Q: Can I add alcohol to this ice cream sandwich cake? A: Adults can enjoy versions with liqueurs added to the whipped cream. Additionally, coffee liqueur pairs wonderfully with chocolate. However, add alcohol sparingly to maintain texture.
Q: How do I prevent the cake from being too hard when frozen? A: Let it soften for 5-10 minutes before serving. Additionally, store at proper freezer temperature. Furthermore, avoid over-freezing, which can make it rock-hard.
Q: Can I make mini versions of ice cream sandwich cake? A: Certainly! Use individual serving dishes or muffin tins. Additionally, mini versions are perfect for parties. Furthermore, they offer better portion control.
Conclusion
This ice cream sandwich cake represents the perfect marriage of simplicity and sophistication. Additionally, it proves that impressive desserts don’t require complex techniques or expensive ingredients. Furthermore, the endless customization possibilities ensure it never gets boring.
Whether you’re hosting a summer barbecue, celebrating a birthday, or simply treating your family, this dessert delivers every time. Moreover, the make-ahead nature takes stress out of entertaining. Additionally, both kids and adults find it irresistible.