Introduction
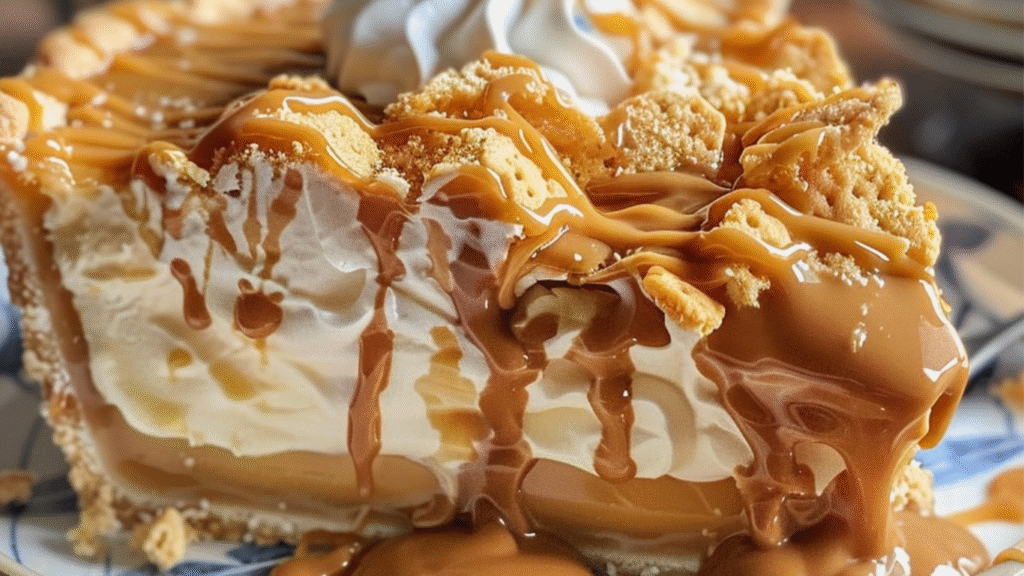
Imagine sinking your fork into a slice of pure peanut butter paradise. Moreover, picture the perfect combination of crunchy cookie crust, silky smooth filling, and rich chocolate drizzle melting on your tongue. This is the magic you’ll experience with every bite of Nutter Butter Pie – a dessert that transforms the beloved sandwich cookie into an extraordinary slice of heaven.
Additionally, this incredible pie captures everything we love about Nutter Butter cookies and elevates it to new heights. Furthermore, the creamy peanut butter filling paired with the signature cookie crust creates a texture contrast that’s absolutely divine. Plus, the glossy chocolate topping adds that final touch of indulgence that makes this dessert truly unforgettable.
What makes this recipe particularly special is its simplicity combined with impressive results. Specifically, you can create this show-stopping dessert in just 20 minutes of prep time. Moreover, it requires no baking, making it perfect for hot summer days or when you need a quick dessert solution.
Why You’ll Love This Nutter Butter Pie
This incredible dessert offers countless reasons to become your new favorite treat. Here’s why this Nutter Butter Pie will have everyone asking for the recipe:
• It’s incredibly easy to make: Perfect for beginners with no baking experience required • It’s a no-bake wonder: Ideal for hot weather or when your oven is occupied • It’s absolutely delicious: Combines all the best flavors of peanut butter and chocolate • It’s crowd-pleasing: Appeals to both kids and adults at any gathering • It’s make-ahead friendly: Actually improves in flavor after chilling overnight • It’s budget-friendly: Uses simple, affordable ingredients you can find anywhere • It’s customizable: Easy to modify with different toppings or mix-ins
Moreover, this pie delivers restaurant-quality results with minimal effort. Additionally, the combination of textures – from the crunchy crust to the smooth filling – creates an eating experience that’s truly memorable. Furthermore, it’s the perfect dessert for peanut butter enthusiasts who want something more sophisticated than cookies but just as satisfying.
The convenience factor cannot be overstated. For instance, you can prepare this pie in the morning and have it ready for dinner. On the other hand, you can make it days ahead for special occasions without any loss in quality or flavor.
Essential Ingredients for Perfect Nutter Butter Pie
Creating the ultimate Nutter Butter Pie requires careful attention to ingredient selection. Specifically, each component plays a vital role in achieving the perfect balance of flavors and textures that make this dessert extraordinary.
Crust Foundation Ingredients
The cookie crust forms the delicious base of your pie. Additionally, these ingredients create the perfect foundation that complements the creamy filling:
• 1 package Nutter Butter cookies, crushed: The star ingredient that provides authentic peanut butter flavor • 1/4 cup melted butter: Binds the cookie crumbs and adds richness to the crust
Creamy Filling Components
The luscious peanut butter filling is where this pie truly shines. Moreover, these ingredients work together to create an incredibly smooth and flavorful center:
• 8 oz cream cheese, softened: Must be at room temperature for smooth blending • 1 cup creamy peanut butter: Choose high-quality brand for best flavor results • 1 cup powdered sugar: Creates sweetness while maintaining smooth texture • 1 teaspoon vanilla extract: Enhances overall flavor complexity • 1 cup heavy whipping cream: Provides light, airy texture when whipped
Chocolate Topping Elements
The final chocolate layer adds visual appeal and flavor contrast. Furthermore, these simple ingredients create a glossy, professional-looking finish:
• 1/2 cup chocolate chips: Use semi-sweet or milk chocolate based on preference • 2 tablespoons heavy cream: Creates smooth, pourable consistency for drizzling
Step-by-Step Guide to Making Nutter Butter Pie
Creating this incredible dessert involves three main phases: crust preparation, filling creation, and final assembly. Additionally, each step builds upon the previous one to ensure perfect results every time.
Step 1: Preparing the Perfect Cookie Crust
The Nutter Butter crust provides the essential foundation for your pie. Therefore, proper preparation ensures both flavor and structural integrity.
- Crush the Nutter Butter cookies until you achieve fine crumbs with some small chunks remaining. Additionally, you can use a food processor or place cookies in a sealed bag and crush with a rolling pin.
- Melt the butter completely and let it cool slightly. Moreover, this prevents the butter from making the mixture too wet or greasy.
- Combine crushed cookies with melted butter until the mixture resembles wet sand. Furthermore, every crumb should be lightly coated with butter.
- Press the mixture firmly into the bottom and up the sides of a 9-inch pie dish. Additionally, use the bottom of a measuring cup to create an even, compact surface.
Pro tip: Refrigerate the crust for 15 minutes while preparing the filling. Moreover, this helps it set properly and prevents cracking when you add the filling.
Step 2: Creating the Silky Peanut Butter Filling
The filling requires careful technique to achieve the perfect light and creamy texture. Furthermore, proper mixing order ensures smooth, lump-free results.
- Beat the cream cheese until completely smooth and fluffy. Additionally, scrape down bowl sides frequently to eliminate any lumps.
- Add peanut butter gradually while continuing to beat the mixture. Moreover, this prevents the filling from becoming too thick or difficult to blend.
- Incorporate powdered sugar and vanilla slowly to prevent lumps. Furthermore, beat until the mixture is completely smooth and well combined.
- Whip heavy cream separately until stiff peaks form. Additionally, be careful not to overwhip, which can cause the cream to become grainy.
- Fold whipped cream into peanut butter mixture gently using a spatula. Moreover, use a folding motion rather than stirring to maintain the light texture.
The key to success lies in gentle incorporation of the whipped cream. Additionally, this technique preserves the airy texture that makes the filling so delightfully smooth and light.
Step 3: Assembly and Chocolate Topping Techniques
Proper assembly creates the beautiful presentation that makes this pie special. Furthermore, the chocolate topping adds both flavor and visual appeal.
- Spread peanut butter filling evenly over the prepared crust. Additionally, use an offset spatula to create a smooth, level surface.
- Melt chocolate chips with heavy cream in 30-second intervals in the microwave. Moreover, stir between intervals to prevent overheating and ensure smooth consistency.
- Drizzle chocolate topping in decorative patterns over the filling. Furthermore, work quickly while the chocolate is still warm and pourable.
- Refrigerate for at least 2 hours to allow proper setting. Additionally, overnight chilling produces the best texture and flavor development.
For professional-looking results, create decorative patterns with the chocolate drizzle. Moreover, you can use a toothpick to create swirl patterns or geometric designs that enhance visual appeal.
Pro Tips for the Best Nutter Butter Pie Results
Achieving perfection with your Nutter Butter Pie requires attention to specific details. Moreover, these professional techniques will elevate your dessert from good to absolutely extraordinary.
Temperature Control Secrets
Temperature management affects every aspect of this pie’s success. Additionally, proper temperature control ensures optimal texture and flavor:
• Room temperature cream cheese blends smoothly without lumps or graininess • Slightly cooled melted butter prevents cookie crust from becoming soggy • Chilled mixing bowls help whipped cream achieve maximum volume and stability • Proper refrigeration time allows all components to set and flavors to meld perfectly
Texture Enhancement Techniques
Creating varied textures makes each bite more interesting and satisfying. Furthermore, these techniques add professional polish to your dessert:
• Leave some cookie chunks in the crust for added texture and visual interest • Reserve extra crushed cookies for garnishing the top of the pie • Create chocolate shavings as an additional garnish for elegant presentation • Add chopped peanuts to the filling for extra crunch and peanut flavor
Make-Ahead Success Strategies
This pie actually improves with proper advance preparation. Additionally, strategic timing ensures the best possible results:
• Prepare up to 3 days ahead for maximum convenience and flavor development • Cover with plastic wrap pressed directly onto the surface to prevent skin formation • Add chocolate drizzle just before serving for the most attractive appearance • Allow 10 minutes at room temperature before serving for optimal texture
Common Mistakes to Avoid When Making Nutter Butter Pie
Even experienced bakers can encounter challenges with no-bake pies. However, avoiding these common pitfalls ensures success with every attempt.
Crust Construction Errors
The cookie crust requires specific attention to achieve proper structure. Moreover, these mistakes can compromise the entire pie’s integrity:
Using too much butter: Additionally, excess butter creates a greasy, unstable crust that won’t hold its shape. Therefore, measure precisely and mix just until the crumbs hold together when pressed.
Crushing cookies too finely: Furthermore, powder-fine crumbs lack texture and structural stability. Specifically, aim for mostly fine crumbs with some small chunks remaining for optimal results.
Insufficient pressing: Moreover, loose crust crumbles when sliced and doesn’t provide proper support. Therefore, press firmly and evenly, paying special attention to corners and edges.
Filling Preparation Problems
The creamy filling demands careful technique for perfect results. Additionally, these errors can result in dense, lumpy, or unstable texture:
Using cold cream cheese: Furthermore, cold cream cheese creates lumps that are nearly impossible to eliminate. Therefore, always allow cream cheese to reach room temperature before beginning.
Overwhipping the cream: Additionally, overwhipped cream becomes grainy and can separate from the mixture. Specifically, stop beating as soon as stiff peaks form.
Rough folding technique: Moreover, aggressive mixing deflates the whipped cream and creates dense filling. Therefore, use gentle folding motions to preserve the light, airy texture.
Assembly and Storage Issues
Proper construction and storage maintain the pie’s quality and appearance. Furthermore, these mistakes can ruin your beautiful creation:
Skipping adequate chilling time: Additionally, insufficient refrigeration prevents proper setting and makes slicing difficult. Therefore, allow at least 2 hours, though overnight is preferred.
Adding hot chocolate topping: Moreover, hot chocolate can melt the filling and create an unappealing appearance. Therefore, let chocolate cool slightly but remain pourable before drizzling.
Improper storage coverage: Furthermore, uncovered pie absorbs refrigerator odors and develops surface skin. Therefore, cover carefully with plastic wrap, ensuring it doesn’t touch the surface.
Creative Variations of Nutter Butter Pie
This versatile dessert serves as an excellent base for numerous creative adaptations. Additionally, these variations allow you to customize flavors and presentations for different occasions and preferences.
Flavor Enhancement Options
Transform your basic pie with these exciting flavor combinations that maintain the essential peanut butter character while adding unique elements:
Chocolate Peanut Butter Supreme: Furthermore, fold mini chocolate chips into the filling and use chocolate cookie crumbs mixed with Nutter Butter crumbs for the crust. Additionally, top with both chocolate and peanut butter drizzles.
Banana Peanut Butter Delight: Moreover, layer sliced bananas over the crust before adding filling, and incorporate banana extract into the peanut butter mixture. Additionally, garnish with banana chips for extra texture.
Caramel Peanut Butter Fusion: Furthermore, swirl caramel sauce through the filling and drizzle both caramel and chocolate on top. Additionally, sprinkle with sea salt for a sophisticated flavor profile.
Cookies and Cream Version: Moreover, fold crushed chocolate sandwich cookies into the filling and create a mixed cookie crust. Additionally, this creates an amazing flavor combination that appeals to all cookie lovers.
Presentation Alternatives
Different serving and presentation styles create unique experiences for various occasions. Furthermore, these options adapt the recipe for different settings:
Individual Mini Pies: Moreover, use tartlet pans to create personal-sized portions perfect for parties. Additionally, these individual servings make portion control easier and presentation more elegant.
Layered Parfait Style: Furthermore, create beautiful layered parfaits in clear glasses using the same components. Additionally, this approach showcases the layers and works well for casual entertaining.
Frozen Pie Version: Moreover, freeze the completed pie for a refreshing summer treat with ice cream-like texture. Additionally, allow slight thawing before serving for optimal consistency.
Nutritional Information and Serving Guidelines
Understanding the nutritional content helps you make informed serving decisions. Additionally, proper portion control allows everyone to enjoy this rich dessert responsibly.
Caloric Content and Portion Recommendations
Each slice of Nutter Butter Pie contains approximately 450 calories, making it a truly indulgent treat. Moreover, this rich dessert is best enjoyed in moderate portions that satisfy without overwhelming.
Recommended serving size: Additionally, cut the pie into 8-10 slices for appropriate portions that provide satisfying richness. Furthermore, smaller slices allow guests to enjoy the flavors without feeling overly full.
Nutritional highlights: Moreover, the pie provides protein from peanut butter and cream cheese, along with calcium and healthy fats. Additionally, while indulgent, it offers some nutritional value beyond empty calories.
Serving Presentation Tips
Proper service techniques enhance the overall dessert experience. Additionally, these methods ensure each slice looks as good as it tastes:
Use a sharp knife dipped in warm water between cuts for clean slices. Moreover, wipe the knife clean after each cut to prevent filling from building up on the blade.
Garnish individual slices with a dollop of whipped cream and a mini Nutter Butter cookie. Furthermore, drizzle additional chocolate or caramel sauce for extra indulgence.
Serve at proper temperature – chilled but not frozen. Additionally, remove from refrigerator 5-10 minutes before serving for optimal texture and easier slicing.
Beverage Pairing Suggestions
The right beverage complements this rich pie perfectly. Moreover, these pairings enhance rather than compete with the peanut butter and chocolate flavors:
Coffee combinations: Furthermore, strong coffee or espresso provides a wonderful contrast to the sweet richness. Additionally, iced coffee works beautifully for summer entertaining.
Milk variations: Moreover, cold milk is the classic pairing that never disappoints. Additionally, flavored milk like chocolate or vanilla creates interesting flavor combinations.
Wine and cocktail options: Furthermore, dessert wines or cream-based cocktails complement the pie’s richness. Additionally, bourbon-based drinks pair surprisingly well with peanut butter flavors.
Storage and Make-Ahead Strategies for Nutter Butter Pie
Proper storage maintains quality and extends the pie’s enjoyable life. Additionally, advance preparation makes entertaining effortless and stress-free.
Refrigeration Best Practices
This no-bake pie requires consistent refrigeration for food safety and optimal texture. Moreover, proper storage prevents spoilage and maintains the pie’s beautiful appearance:
Initial setting period: Additionally, allow at least 2 hours for proper firming, though overnight chilling produces superior results. Furthermore, this time allows flavors to meld and textures to stabilize perfectly.
Long-term storage guidelines: Moreover, cover the pie tightly with plastic wrap or store in an airtight container. Additionally, consume within 4-5 days for optimal quality and food safety.
Serving temperature management: Furthermore, keep refrigerated until ready to serve, then allow brief room temperature softening. Additionally, avoid leaving at room temperature for extended periods to prevent spoilage.
Advanced Preparation Techniques
Strategic advance preparation creates better results while reducing last-minute stress. Moreover, these techniques ensure entertaining success:
Component preparation timeline: Additionally, prepare the crust up to 2 days ahead and store covered. Furthermore, this allows you to focus on the filling when ready to complete the pie.
Complete pie assembly: Moreover, finish the entire pie up to 3 days before serving. Additionally, the flavors actually improve and meld better with extended chilling time.
Final garnish timing: Furthermore, add delicate garnishes like whipped cream or extra cookie crumbs just before serving. Additionally, this maintains the best visual appeal and prevents soggy textures.
Troubleshooting Your Nutter Butter Pie Issues
Even with careful preparation, challenges can arise during pie-making. However, these solutions help you achieve consistently perfect results every time.
Texture and Consistency Problems
Achieving the ideal texture balance requires attention to multiple factors. Moreover, these fixes address the most common texture-related issues:
Runny or loose filling: Furthermore, this typically results from underwhipped cream or warm ingredients. Additionally, chill the pie longer, or add a small amount of gelatin dissolved in water to help stabilize the filling.
Dense or heavy filling: Moreover, this occurs when whipped cream is overbeaten or folded too vigorously. Therefore, start with fresh cream and use the gentlest folding technique possible to maintain airiness.
Crumbly or unstable crust: Additionally, this happens when there’s insufficient butter or inadequate pressing. Furthermore, add melted butter one tablespoon at a time until mixture holds together when pressed.
Assembly and Appearance Solutions
Perfect presentation requires proper technique and timing. Additionally, these adjustments help correct common assembly and visual issues:
Uneven chocolate drizzle: Moreover, ensure chocolate mixture is properly heated and smooth before drizzling. Furthermore, work quickly while chocolate remains fluid, and use a spoon or squeeze bottle for better control.
Cracked or broken crust: Additionally, this usually indicates the crust was too cold when filling was added. Therefore, let the crust come to room temperature slightly before adding the filling layer.
Soggy bottom crust: Furthermore, this occurs when filling is too warm or contains excess moisture. Therefore, ensure all components are properly chilled before assembly, and consider adding a thin layer of melted chocolate to seal the crust.
FAQs About Nutter Butter Pie
Q: Can I make this Nutter Butter Pie ahead of time?
A: Absolutely! Additionally, this pie actually improves when made in advance. Moreover, prepare it up to 3 days ahead and store covered in the refrigerator. Furthermore, the flavors develop and meld beautifully, creating an even more delicious result than serving immediately.
Q: How do I make my Nutter Butter Pie healthier?
A: Several modifications can reduce calories while maintaining great flavor. For instance, use reduced-fat cream cheese and substitute half the heavy cream with Greek yogurt. Additionally, reduce the powdered sugar slightly and add natural peanut butter for less added sugar. Moreover, consider using sugar-free chocolate chips for the topping.
Q: What’s the best way to crush Nutter Butter cookies for the crust?
A: Several methods work well for crushing cookies effectively. Additionally, a food processor provides the most consistent results with good control over texture. Moreover, placing cookies in a sealed plastic bag and crushing with a rolling pin works perfectly for small batches. Furthermore, aim for mostly fine crumbs with some small chunks remaining for optimal texture.
Q: Can I use natural peanut butter instead of regular?
A: Natural peanut butter can work, but it requires some adjustments. Additionally, natural peanut butter is typically less sweet and has a thinner consistency. Moreover, you may need to add slightly more powdered sugar and ensure the peanut butter is well-stirred before using. Furthermore, drain any oil that has separated for best results.
Q: How long does this Nutter Butter Pie last in the refrigerator?
A: When properly stored, the pie maintains excellent quality for 4-5 days. Additionally, cover tightly with plastic wrap to prevent absorption of refrigerator odors and surface drying. Moreover, the texture and flavor remain consistent throughout this period. Furthermore, always check for any signs of spoilage before serving, especially in warm weather.
Q: Why is my pie filling not setting properly?
A: Several factors can prevent proper setting of the filling. For instance, insufficient chilling time is the most common cause – allow at least 2 hours, preferably overnight. Additionally, underwhipped cream or ingredients that were too warm during mixing can prevent proper firming. Moreover, high humidity can also affect setting time, so be patient in humid conditions.
Q: Can I freeze this dessert?
A: While possible, freezing significantly changes the texture and isn’t generally recommended. Additionally, the cream-based filling doesn’t freeze well and may separate upon thawing. Moreover, the cookie crust becomes very hard when frozen. Therefore, refrigerated storage produces much better results for both texture and flavor.
Q: What can I substitute for heavy whipping cream?
A: Several alternatives can work depending on your dietary needs and preferences. For instance, you can use whipped topping from a container, though the texture will be slightly different. Additionally, coconut cream whips well and provides a dairy-free option with subtle flavor. Moreover, combining Greek yogurt with a small amount of milk creates a lighter alternative, though it won’t whip to the same volume.
Conclusion
Creating the perfect Nutter Butter Pie combines simplicity with spectacular results that will impress family and friends alike. Moreover, this no-bake dessert represents the ideal solution for busy schedules while delivering restaurant-quality flavors and presentation.
Throughout this comprehensive guide, we’ve explored every aspect of creating this incredible dessert. Additionally, from selecting the right ingredients to mastering assembly techniques, each detail contributes to the final masterpiece. Furthermore, the versatility of this recipe allows for endless creativity and personal touches that make it uniquely yours.
Print
Nutter Butter Pie: The Ultimate Peanut Butter Dessert Guide
- Total Time: 20 minutes
Description
Satisfy your sweet tooth with this indulgent Nutter Butter Pie! Featuring a crunchy Nutter Butter crust, creamy peanut butter filling, and a decadent chocolate topping, this pie is a peanut butter lover’s dream.
Ingredients
1 package Nutter Butter cookies, crushed
1/4 cup melted butter
8 oz cream cheese, softened
1 cup creamy peanut butter
1 cup powdered sugar
1 teaspoon vanilla extract
1 cup heavy whipping cream
1/2 cup chocolate chips
2 tablespoons heavy cream (for chocolate topping)
Instructions
In a bowl, mix the crushed Nutter Butter cookies with melted butter. Press the mixture into the bottom of a pie dish to form the crust.
In another bowl, beat the cream cheese, peanut butter, powdered sugar, and vanilla extract until smooth.
In a separate bowl, whip the heavy whipping cream until stiff peaks form. Fold the whipped cream into the peanut butter mixture until fully combined.
Spread the peanut butter filling evenly over the crust.
In a microwave-safe bowl, melt the chocolate chips with 2 tablespoons of heavy cream, stirring until smooth. Drizzle over the pie.
Refrigerate for at least 2 hours before serving to allow the pie to set.
Prep Time: 20 minutes
- Prep Time: 20 mins