
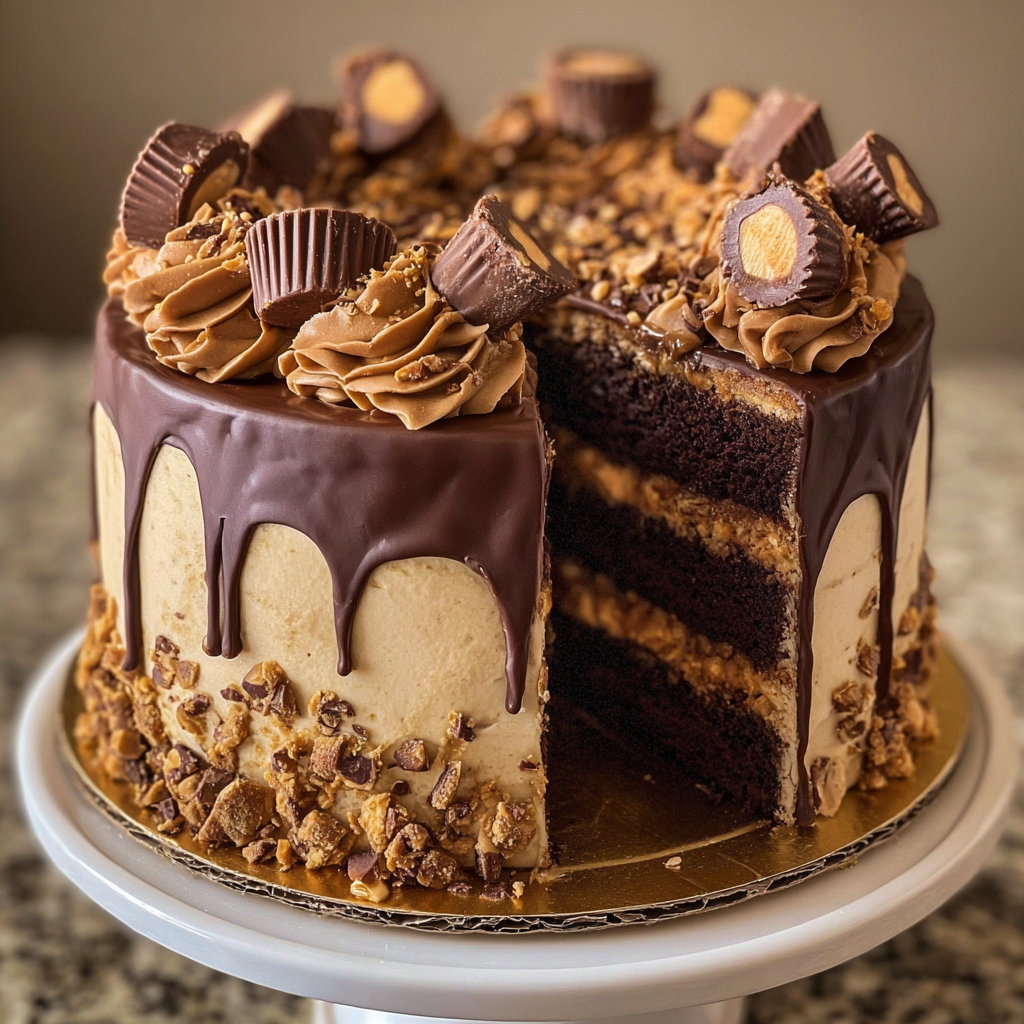
Imagine cutting into a towering masterpiece where rich chocolate cake meets creamy peanut butter frosting in perfect harmony. Peanut butter cup overload cake represents the pinnacle of indulgent dessert making, combining America’s favorite candy with classic layer cake techniques. Moreover, this show-stopping creation features three decadent chocolate layers, luxurious peanut butter buttercream, and glossy chocolate ganache.
Furthermore, this isn’t just another chocolate cake with peanut butter frosting. Additionally, chopped peanut butter cups hidden between layers create delightful textural surprises in every bite. The combination of smooth frosting, tender cake, and candy pieces creates an unforgettable eating experience.
Print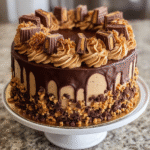
Peanut Butter Cup Overload Cake: The Ultimate Chocolate Peanut Butter Dessert
- Total Time: 1 hr 45 mins
- Yield: 12–16 servings 1x
- Diet: Vegetarian
Description
Peanut Butter Cup Overload Cake is a decadent, show-stopping dessert layered with rich chocolate cake, creamy peanut butter frosting, chopped peanut butter cups, and a silky chocolate ganache. Every bite is pure indulgence, making it perfect for birthdays, parties, or whenever you’re craving the ultimate chocolate-peanut butter combo!
Ingredients
- For the Cake:
- 2 cups all-purpose flour
- 1 cup unsweetened cocoa powder
- 2 tsp baking powder
- 1 tsp baking soda
- 1/2 tsp salt
- 1 cup unsalted butter, softened
- 1 1/2 cups granulated sugar
- 4 large eggs
- 1 cup sour cream
- 1/2 cup whole milk
- 1 tsp vanilla extract
- For the Frosting:
- 1 cup creamy peanut butter
- 1/2 cup unsalted butter, softened
- 2 cups powdered sugar
- 1/4 cup heavy cream
- 1 tsp vanilla extract
- 12–15 miniature peanut butter cups, chopped
- For the Ganache:
- 1 cup semi-sweet chocolate chips
- 1/2 cup heavy cream
- For Garnish:
- Additional peanut butter cups
Instructions
- Preheat oven to 350°F (175°C). Grease and flour three 8-inch round cake pans.
- In a medium bowl, whisk together flour, cocoa powder, baking powder, baking soda, and salt.
- In a large mixing bowl, cream butter and sugar until light and fluffy.
- Add eggs one at a time, mixing well. Then mix in sour cream, milk, and vanilla until combined.
- Gradually add dry ingredients, mixing until just combined. Divide batter evenly between pans.
- Bake for 25–30 minutes, or until a toothpick comes out clean. Cool in pans 10 minutes, then transfer to wire racks to cool completely.
- For the frosting: Beat peanut butter and softened butter until smooth. Add powdered sugar, cream, and vanilla; beat until fluffy.
- To assemble: Place one cake layer on a serving plate. Spread frosting, sprinkle with chopped peanut butter cups, and repeat with second layer.
- Top with final cake layer and frost the top and sides with remaining frosting.
- Make the ganache: Heat cream until simmering, pour over chocolate chips, let sit 2 minutes, then stir until smooth.
- Pour ganache over the cake, allowing it to drip down sides. Garnish with additional peanut butter cups.
- Chill for 30 minutes to set ganache before serving.
Notes
- Use room temperature ingredients for the smoothest batter and frosting.
- If using natural peanut butter, expect a softer frosting with less sweetness.
- Store covered in the refrigerator for up to 5 days.
- Prep Time: 45 mins
- Cook Time: 25–30 mins
- Category: Dessert
- Method: Baking
- Cuisine: American
Nutrition
- Serving Size: 1 slice
- Calories: 580 kcal
- Sugar: 45 g
- Sodium: 220 mg
- Fat: 35 g
- Saturated Fat: 18 g
- Unsaturated Fat: 13 g
- Trans Fat: 0.5 g
- Carbohydrates: 60 g
- Fiber: 3 g
- Protein: 8 g
- Cholesterol: 90 mg
Keywords: peanut butter cup cake, chocolate peanut butter dessert, chocolate ganache cake, Reese’s cake, layer cake recipe, party cake, chocolate lovers dessert
Why You’ll Love This Peanut Butter Cup Overload Cake
This peanut butter cup overload cake isn’t just dessert – it’s an experience that satisfies every chocolate and peanut butter craving imaginable. Here’s why it’ll become your go-to celebration cake:
• It’s the ultimate flavor combination: Rich chocolate cake provides the perfect canvas for creamy peanut butter frosting. Additionally, the contrast between sweet chocolate and salty peanut butter creates irresistible balance.
• It’s incredibly impressive visually: Three towering layers topped with glossy ganache create stunning presentation. Moreover, the dripping chocolate effect looks professionally made even for home bakers.
• It’s surprisingly achievable: Despite its elaborate appearance, the techniques are straightforward. Furthermore, each component can be prepared separately, making the process manageable even for busy schedules.
• It’s perfect for celebrations: This cake feeds a crowd and creates memorable moments. Additionally, its dramatic appearance makes it worthy of the most special occasions.
• It’s completely customizable: Adjust sweetness levels, add different mix-ins, or change the presentation style. Moreover, dietary modifications are possible without sacrificing flavor significantly.
• It’s make-ahead friendly: Components can be prepared in advance and assembled before serving. Furthermore, the flavors actually improve after resting overnight in the refrigerator.
Essential Ingredients for Perfect Peanut Butter Cup Overload Cake
Creating exceptional peanut butter cup overload cake begins with understanding each ingredient’s crucial role. Moreover, quality ingredients make the difference between good and extraordinary results.
The Chocolate Foundation: Unsweetened cocoa powder creates deep, rich chocolate flavor without excessive sweetness. Additionally, Dutch-processed cocoa produces more intense color and flavor. Moreover, sifting cocoa powder prevents lumps in your finished batter.
The Structure Builders: All-purpose flour provides the cake’s basic structure through gluten development. Furthermore, proper measuring ensures consistent texture across all layers. Additionally, cake flour can be substituted for more tender results.
The Leavening Agents: Baking powder and baking soda work together to create light, fluffy texture. Moreover, fresh leavening agents are essential for proper rising. Additionally, the combination creates the perfect crumb structure for layering.
The Fat Components: Unsalted butter contributes richness, flavor, and tender texture. Furthermore, room temperature butter creams properly with sugar. Additionally, sour cream adds moisture and slight tang that complements chocolate beautifully.
The Peanut Butter Star: Creamy peanut butter creates smooth, pipeable frosting consistency. Moreover, commercial brands like Jif or Skippy work better than natural varieties. Additionally, the oils in processed peanut butter help create stable frosting.
The Sweetness Balance: Granulated sugar provides structure and sweetness to the cake layers. Furthermore, powdered sugar creates smooth frosting without grittiness. Additionally, the different sugar types serve specific textural purposes.
The Liquid Elements: Whole milk adds richness and helps create tender crumb. Moreover, heavy cream in both frosting and ganache provides luxurious mouthfeel. Additionally, these dairy components contribute to the cake’s overall richness.
The Flavor Enhancers: Pure vanilla extract brightens all other flavors significantly. Furthermore, it balances the richness of chocolate and peanut butter. Additionally, quality vanilla makes a noticeable difference in the final taste.
The Textural Stars: Miniature peanut butter cups provide delightful surprises throughout each slice. Moreover, chopping them creates even distribution without overwhelming individual bites. Additionally, they add visual interest and authentic candy flavor.
The Ganache Components: Semi-sweet chocolate chips create smooth, glossy ganache when melted properly. Furthermore, the ratio of chocolate to cream determines final consistency. Additionally, quality chocolate produces superior flavor and appearance.
Step-by-Step Guide to Making Peanut Butter Cup Overload Cake
Creating this peanut butter cup overload cake requires careful attention to each component and proper assembly technique. However, breaking the process into manageable steps ensures success.
Step 1: Preparing the Chocolate Cake Layers
Begin by preheating your oven to 350°F and preparing three 8-inch round cake pans. Additionally, grease them thoroughly and dust with cocoa powder instead of flour. Moreover, this prevents white residue on your finished chocolate layers.
Whisk together all dry ingredients in a medium bowl until well combined. Furthermore, sifting these ingredients together creates more uniform distribution. Additionally, this step prevents pockets of cocoa or flour in your finished cake.
In a large mixing bowl, cream softened butter and granulated sugar until light and fluffy. Moreover, this process typically takes 4-5 minutes with an electric mixer. Additionally, proper creaming incorporates air for lighter texture.
Add eggs one at a time, beating well after each addition. Furthermore, scrape down bowl sides frequently to ensure even mixing. Additionally, room temperature eggs incorporate more easily and create smoother batter.
Step 2: Combining Wet and Dry Ingredients
Mix sour cream, milk, and vanilla extract in a separate bowl until smooth. Additionally, having these combined makes the mixing process more efficient. Moreover, this prevents overmixing when combining with flour mixture.
Alternate adding dry ingredients and liquid mixture to the creamed butter. Furthermore, begin and end with dry ingredients for best texture. Additionally, mix just until combined to prevent tough cake layers.
The finished batter should be smooth but not overmixed. Moreover, some small lumps are acceptable and will disappear during baking. Additionally, overmixed batter creates dense, tough cake layers.
Divide batter evenly among prepared pans using a kitchen scale for accuracy. Furthermore, smooth tops with an offset spatula for even baking. Additionally, tap pans gently to release air bubbles before baking.
Step 3: Baking and Cooling the Layers
Bake layers for 25-30 minutes, rotating pans halfway through for even browning. Moreover, test doneness with a toothpick inserted in the center. Additionally, properly baked layers will spring back when lightly touched.
Cool cakes in pans for exactly 10 minutes before turning out. Furthermore, this prevents breaking while ensuring they don’t stick. Additionally, run a knife around edges to loosen if necessary.
Turn layers onto wire racks and cool completely before frosting. Moreover, warm layers will melt frosting and create messy results. Additionally, completely cooled layers are easier to handle and slice.
Level cake layers with a serrated knife if needed for professional appearance. Furthermore, even layers create more stable final assembly. Additionally, save trimmings for snacking or making cake pops.
Step 4: Creating the Peanut Butter Frosting
Beat peanut butter and softened butter together until completely smooth. Additionally, this process takes 3-4 minutes to achieve proper consistency. Moreover, ensure no butter lumps remain for silky frosting.
Gradually add powdered sugar, beating continuously to prevent sugar clouds. Furthermore, scrape down bowl sides frequently during this process. Additionally, add sugar in three additions for smoother incorporation.
Pour in heavy cream and vanilla extract, then beat until light and fluffy. Moreover, the frosting should hold peaks but remain spreadable. Additionally, adjust consistency with more cream or powdered sugar as needed.
Taste and adjust sweetness or peanut butter flavor as desired. Furthermore, some prefer more intense peanut butter flavor. Additionally, a pinch of salt can enhance overall flavor balance.
Step 5: Assembly and Final Decoration
Place first cake layer on serving plate or cake stand. Additionally, use dabs of frosting to secure it in place. Moreover, this prevents sliding during assembly and serving.
Spread approximately one-third of frosting evenly over the first layer. Furthermore, use an offset spatula for smooth, professional appearance. Additionally, create a slight well in the center to prevent filling overflow.
Sprinkle chopped peanut butter cups generously over the frosting layer. Moreover, press them lightly to ensure they stick properly. Additionally, reserve some pieces for final decoration.
Repeat layering process with second cake layer, frosting, and candy pieces. Furthermore, ensure even distribution for consistent flavor in every slice. Additionally, check that layers are properly aligned.
Place final cake layer on top and spread remaining frosting over top and sides. Moreover, create smooth surfaces using bench scraper or offset spatula. Additionally, refrigerate assembled cake while preparing ganache.
Step 6: Creating and Applying Chocolate Ganache
Heat heavy cream in a small saucepan until just simmering around edges. Additionally, don’t let it boil vigorously as this can break the ganache. Moreover, watch carefully as cream heats quickly.
Pour hot cream over chocolate chips in a heatproof bowl. Furthermore, let sit undisturbed for 2-3 minutes to soften chocolate. Additionally, this resting time ensures smooth ganache consistency.
Stir from center outward until completely smooth and glossy. Moreover, proper ganache should coat a spoon smoothly. Additionally, let cool slightly before pouring for better dripping effect.
Pour ganache over chilled cake, starting from the center and working outward. Furthermore, use an offset spatula to encourage drips if needed. Additionally, work quickly as ganache sets rapidly.
Arrange additional peanut butter cups on top while ganache is still soft. Moreover, press them lightly to ensure they adhere properly. Additionally, create attractive patterns or clusters for visual impact.
Pro Tips for Perfect Peanut Butter Cup Overload Cake
Creating bakery-quality peanut butter cup overload cake requires mastering several professional techniques. Furthermore, these insider secrets ensure impressive results every time.
Temperature Management: All ingredients should be at room temperature for optimal mixing. Additionally, cold ingredients don’t combine properly and create lumpy textures. Moreover, plan ahead and remove ingredients from refrigerator 2-3 hours early.
Measuring Accuracy: Weigh ingredients when possible for consistent results across batches. Furthermore, cocoa powder and flour settle differently each time. Additionally, spoon and level dry ingredients when scales aren’t available.
Frosting Consistency: Perfect peanut butter frosting should hold peaks but spread easily. Moreover, too thick frosting tears cake layers during application. Additionally, adjust with cream or powdered sugar to achieve ideal consistency.
Ganache Perfection: Use chocolate to cream ratio of 2:1 for proper dripping consistency. Furthermore, let ganache cool slightly before pouring for controlled flow. Additionally, practice dripping technique on practice plates first.
Assembly Strategy: Chill each layer briefly after frosting for easier handling. Moreover, cold frosting sets up and prevents sliding layers. Additionally, use turntable for easier decorating and smoother finishes.
Storage Solutions: Cover assembled cake loosely with plastic wrap to prevent drying. Furthermore, refrigerate for up to 4 days for optimal freshness. Additionally, bring to room temperature 30 minutes before serving.
Common Mistakes to Avoid When Making Peanut Butter Cup Overload Cake
Even experienced bakers can struggle with peanut butter cup overload cake due to its multiple components. However, understanding these pitfalls prevents disappointing results.
Overmixing the Batter: Excessive mixing after adding flour creates tough, dense cake layers. Moreover, mix just until ingredients are combined for tender results. Additionally, some small lumps will disappear during baking.
Incorrect Oven Temperature: Too high temperature creates domed tops and uneven baking. Furthermore, invest in an oven thermometer for accuracy verification. Additionally, rotate pans halfway through for even browning.
Warm Layers During Assembly: Frosting melts on warm cake layers creating messy results. Moreover, completely cooled layers are essential for clean assembly. Additionally, patience during cooling prevents many common problems.
Broken Ganache: Overheated cream or old chocolate can cause ganache to break. Furthermore, gentle heating and quality chocolate prevent this issue. Additionally, let cream cool slightly before adding to chocolate.
Uneven Frosting Distribution: Insufficient frosting between layers creates unstable construction. Moreover, measure frosting portions for consistent layer thickness. Additionally, reserve enough frosting for smooth exterior coating.
Improper Storage: Uncovered cake dries out quickly and absorbs refrigerator odors. Furthermore, airtight containers can damage delicate decorations. Additionally, loose plastic wrap provides protection without damage.
Creative Variations for Your Peanut Butter Cup Overload Cake
Once you’ve mastered the classic peanut butter cup overload cake, exploring variations keeps this showstopper exciting. Furthermore, these adaptations accommodate different preferences and dietary needs.
Different Candy Mix-Ins: Replace peanut butter cups with other chocolate-peanut butter candies. Additionally, Reese’s Pieces add colorful crunch and intense flavor. Moreover, chopped peanut butter cookies create interesting texture variations.
Salted Caramel Addition: Drizzle salted caramel between layers for extra indulgence. Furthermore, the salt balances sweetness and enhances chocolate flavors. Additionally, homemade caramel elevates the overall sophistication.
Nutty Enhancements: Add chopped roasted peanuts to frosting for extra crunch. Moreover, toasted peanuts provide deeper flavor than raw varieties. Additionally, other nuts like pecans or almonds create different flavor profiles.
Chocolate Variations: Use white chocolate ganache for dramatic color contrast. Furthermore, milk chocolate creates sweeter, mellower flavor profile. Additionally, dark chocolate ganache provides more intense, sophisticated taste.
Seasonal Adaptations: Create Halloween versions using orange-colored frosting and themed decorations. Moreover, Valentine’s Day adaptations can feature heart-shaped candy pieces. Additionally, match decorations to celebration themes.
Size Modifications: Make individual cupcake versions for easier serving and portion control. Furthermore, sheet cake versions work well for large gatherings. Additionally, mini layer cakes create elegant individual desserts.
Serving Suggestions and Presentation Ideas for Peanut Butter Cup Overload Cake
Peanut butter cup overload cake deserves presentation that matches its impressive flavor profile. Moreover, thoughtful serving enhances the overall dining experience significantly.
Plating Techniques: Slice with a sharp, clean knife wiped between cuts for neat portions. Additionally, warm the knife slightly in hot water for easier cutting. Moreover, use gentle sawing motions to prevent crushing layers.
Portion Considerations: This rich cake serves 12-16 people with generous portions. Furthermore, smaller slices satisfy most appetites due to intense richness. Additionally, provide dessert forks for comfortable eating.
Beverage Pairings: Strong coffee balances the sweetness and cuts through richness beautifully. Moreover, cold milk creates classic comfort food combination. Additionally, vanilla ice cream alongside warm cake creates temperature contrast.
Garnish Options: Dust plates lightly with cocoa powder for professional presentation. Furthermore, fresh berries add color and tartness to balance richness. Additionally, mint sprigs provide fresh color contrast.
Temperature Serving: Room temperature cake offers optimal flavor and texture. Moreover, remove from refrigerator 30 minutes before serving. Additionally, cold cake mutes flavors and creates firmer textures.
Special Occasion Adaptations: Add candles directly to the ganache for birthday celebrations. Furthermore, sparkler candles create dramatic effects for milestone birthdays. Additionally, themed cake toppers personalize the presentation.
Storage and Make-Ahead Strategies for Peanut Butter Cup Overload Cake
While peanut butter cup overload cake tastes best fresh, proper planning extends its quality and simplifies entertaining. Additionally, strategic preparation reduces last-minute stress significantly.
Component Preparation: Bake cake layers up to 3 days ahead and wrap tightly at room temperature. Furthermore, frosting can be made 2 days early and refrigerated. Additionally, bring frosting to room temperature and re-whip before using.
Assembly Timeline: Assemble completed cake up to 24 hours before serving for optimal flavor melding. Moreover, flavors actually improve with overnight resting. Additionally, add final garnishes just before serving for best appearance.
Proper Storage Methods: Store assembled cake in refrigerator covered loosely with plastic wrap. Furthermore, avoid airtight containers which can damage decorative elements. Additionally, place toothpicks in frosting to prevent plastic wrap contact.
Freezing Guidelines: Individual cake layers freeze beautifully for up to 3 months when wrapped properly. Moreover, thaw completely before frosting for best results. Additionally, assembled cake doesn’t freeze well due to ganache texture changes.
Quality Maintenance: Check stored cake daily for any signs of deterioration or off-odors. Furthermore, properly stored cake maintains quality for 4-5 days maximum. Additionally, discard if any mold appears or texture becomes unappetizing.
Transportation Tips: Use cake boxes with adequate height clearance for safe transport. Moreover, chill cake thoroughly before moving to set decorative elements. Additionally, bring cake to room temperature at destination before serving.
Nutritional Information and Dietary Modifications
Understanding the nutritional profile of peanut butter cup overload cake helps with meal planning and dietary considerations. Furthermore, several modifications can accommodate various dietary restrictions.
Caloric Content: Each generous slice contains approximately 650-750 calories depending on size. Additionally, the high fat content from butter, peanut butter, and chocolate contributes most calories. Moreover, this is definitely an occasional indulgence dessert.
Macronutrient Breakdown: The cake provides primarily carbohydrates and fats with moderate protein from eggs and peanut butter. Furthermore, it’s low in fiber and most micronutrients. Additionally, the sugar content is quite high from multiple sources.
Reducing Sugar Content: Substitute part of the granulated sugar with sugar alternatives in the cake layers. Moreover, use sugar-free chocolate chips in ganache preparation. Additionally, these modifications will affect texture and flavor somewhat.
Gluten-Free Adaptations: Replace all-purpose flour with gluten-free flour blends designed for baking. Furthermore, ensure all other ingredients are certified gluten-free. Additionally, xanthan gum may be necessary for proper binding.
Dairy-Free Modifications: Substitute dairy-free butter alternatives and coconut cream for heavy cream. Moreover, use dairy-free chocolate chips for ganache preparation. Additionally, the texture and flavor will differ from traditional versions.
Portion Control Strategies: Cut smaller slices and serve with fresh fruit to balance richness. Furthermore, this intense cake satisfies sweet cravings with smaller portions. Additionally, share slices to enjoy without overindulging.
Troubleshooting Your Peanut Butter Cup Overload Cake
Even careful bakers occasionally encounter issues with peanut butter cup overload cake. However, understanding common problems and solutions ensures success.
Cake Layers Are Dense: Overmixing or incorrect measurements typically cause dense texture. Additionally, ensure leavening agents are fresh and properly measured. Moreover, check oven temperature accuracy with a thermometer.
Frosting Won’t Hold Peaks: Warm ingredients or overmixing can cause runny frosting. Furthermore, chill the frosting briefly and re-whip gently. Additionally, add more powdered sugar gradually to thicken consistency.
Ganache Won’t Set: Too much cream or insufficient chocolate creates runny ganache. Moreover, let it cool longer or add more melted chocolate. Additionally, refrigerate briefly to help setting process.
Layers Slide During Assembly: Warm frosting or uneven layers cause sliding problems. Furthermore, chill each layer briefly after frosting application. Additionally, ensure cake layers are completely level.
Cracked Cake Layers: Overbaking or too high temperature causes cracking issues. Moreover, check doneness early and reduce temperature if needed. Additionally, cover cracks with generous frosting application.
Ganache Drips Unevenly: Ganache that’s too warm or cold affects dripping patterns. Furthermore, test consistency on practice surface first. Additionally, adjust temperature and re-pour if necessary.
Advanced Techniques for Professional Results
Elevating your peanut butter cup overload cake from good to exceptional requires mastering professional pastry techniques. Moreover, these advanced methods create bakery-quality results.
Perfect Layer Leveling: Use cake leveling tools or long serrated knives for even layers. Additionally, measure layer heights for consistency across all tiers. Furthermore, level layers create more stable final assembly.
Smooth Frosting Application: Use bench scrapers for perfectly smooth frosting sides. Moreover, dip tools in warm water for easier smoothing. Additionally, practice techniques on practice cakes for muscle memory development.
Professional Ganache Drips: Control ganache temperature precisely for perfect dripping consistency. Furthermore, practice pouring techniques for even, attractive drips. Additionally, use squeeze bottles for more controlled application.
Decoration Precision: Plan decoration placement before applying for balanced appearance. Moreover, use tweezers for precise candy placement. Additionally, step back frequently to assess overall visual balance.
Flavor Balance Mastery: Taste each component and adjust seasoning as needed. Furthermore, balance sweet, salty, and rich elements carefully. Additionally, consider texture contrasts in every bite.
Quality Control Standards: Develop critical evaluation skills for consistent results. Moreover, document successful techniques for recipe repeatability. Additionally, continuously refine methods based on results.
FAQs About Peanut Butter Cup Overload Cake
Q: How far in advance can I make peanut butter cup overload cake? A: Cake layers can be baked 3 days ahead, and frosting made 2 days early. Additionally, assemble the complete cake up to 24 hours before serving. Moreover, flavors actually improve with overnight resting in the refrigerator.
Q: Can I use natural peanut butter instead of processed peanut butter? A: Natural peanut butter works but creates different frosting consistency due to oil separation. Furthermore, you may need to adjust liquid amounts slightly. Additionally, the flavor will be less sweet and more intensely nutty.
Q: Why did my chocolate ganache turn out grainy? A: Overheated cream or old chocolate typically causes grainy ganache. Moreover, water contamination can also break ganache emulsion. Additionally, ensure all equipment is completely dry and use gentle heating methods.
Q: How do I prevent cake layers from doming during baking? A: Use correct oven temperature and avoid overmixing batter. Furthermore, cake strips around pans help create even baking. Additionally, slightly lower temperature with longer baking time prevents doming.
Q: Can I make this cake in different pan sizes? A: Yes, but adjust baking times accordingly – larger pans need longer baking, smaller pans less time. Moreover, maintain the same oven temperature for consistent results. Additionally, you may need different amounts of frosting for different sized layers.
Q: What’s the best way to cut clean slices of this rich cake? A: Use a sharp, clean knife warmed in hot water between cuts. Furthermore, wipe the blade clean after each slice for neat presentation. Additionally, gentle sawing motions prevent crushing the delicate layers.
Q: How do I fix frosting that’s too sweet? A: Add a pinch of salt or more peanut butter to balance excessive sweetness. Moreover, a small amount of cream cheese can provide tang. Additionally, taste and adjust gradually to avoid overcorrection.
Q: Can I freeze the assembled cake? A: Individual cake layers freeze well, but assembled cake with ganache doesn’t freeze successfully. Furthermore, the ganache texture changes significantly when frozen. Additionally, freeze components separately for best results.
Q: Why are my cake layers sticking to the pans? A: Insufficient greasing or cooling too long in pans causes sticking. Moreover, use cocoa powder instead of flour for dusting chocolate cakes. Additionally, run a knife around edges before turning out.
Q: How do I know when the ganache is the right consistency for dripping? A: Properly cooled ganache should coat a spoon but still flow smoothly. Furthermore, test on practice surface before applying to cake. Additionally, it should create controlled drips rather than running off completely.
Q: Can I add other mix-ins besides peanut butter cups? A: Absolutely! Try chopped peanut brittle, toffee pieces, or chocolate chunks. Moreover, maintain similar-sized pieces for even distribution. Additionally, consider flavor compatibility with chocolate and peanut butter.
Q: What causes the frosting to separate or curdle? A: Temperature differences between ingredients or overmixing typically cause separation. Furthermore, bring all ingredients to room temperature before mixing. Additionally, beat just until smooth to prevent overworking.
Conclusion
Peanut butter cup overload cake represents the ultimate expression of America’s favorite flavor combination, transforming simple ingredients into an extraordinary celebration centerpiece. Moreover, mastering this impressive dessert demonstrates advanced baking skills while delivering pure indulgence in every bite. Additionally, the satisfaction of creating such a show-stopping cake from scratch never diminishes.
Furthermore, this versatile recipe adapts beautifully to different occasions and personal preferences while maintaining its core appeal. Whether you customize the candy mix-ins, adjust the sweetness levels, or modify the presentation style, the fundamental chocolate-peanut butter magic remains constant. Additionally, each successful cake builds confidence for tackling even more ambitious baking projects.


