Introduction
Looking for a dessert that’s both impressive and effortless? Furthermore, you’ve come to the right place! The no-bake Funfetti Oreo icebox cake combines the beloved flavors of colorful sprinkles and chocolate cookies into one show-stopping treat. Additionally, this dessert requires zero baking skills and minimal prep time.
Moreover, this cake delivers maximum flavor with minimum effort. In fact, you’ll have guests asking for your secret recipe! Therefore, let’s dive into everything you need to know about creating this delightful dessert.
Why You’ll Love This No-Bake Funfetti Oreo Icebox Cake
This incredible dessert offers numerous benefits that make it perfect for any occasion. Furthermore, here’s why this recipe will become your new favorite:
• It’s incredibly easy to make: Perfect for beginners who want impressive results without complex techniques • No baking required: Save time and energy with this simple assembly process • Crowd-pleasing flavor: Combines the nostalgic taste of Funfetti with beloved Oreo cookies • Make-ahead friendly: Actually improves in flavor when prepared hours or days in advance • Customizable options: Easily adapt ingredients to suit different preferences and dietary needs • Budget-friendly ingredients: Uses common pantry and store-bought items • Perfect portion control: Cuts into neat squares for easy serving
Additionally, this dessert works wonderfully for birthdays, potlucks, and holiday gatherings. Moreover, children and adults alike will fall in love with its colorful, festive appearance.
Essential Ingredients for Your Funfetti Oreo Icebox Cake
Before starting your no-bake Funfetti Oreo icebox cake, gather these simple ingredients. Furthermore, most items are readily available at your local grocery store:
Main Components
Funfetti Oreo Cookies (14.3 oz package): These special cookies provide the cake’s signature flavor and texture. However, regular Oreos work as a substitute if needed.
Cold Milk (2 cups): Essential for creating the smooth pudding base. Additionally, whole milk produces the creamiest results.
Instant Vanilla Pudding Mix (3.4 oz package): Creates the cake’s luxurious, creamy layers. Moreover, this ingredient ensures perfect consistency every time.
Frozen Whipped Topping (8 oz container, thawed): Adds lightness and helps create distinct layers. Furthermore, this ingredient makes the cake incredibly fluffy.
Colorful Sprinkles: The finishing touch that makes this dessert truly special. Additionally, choose funfetti-style sprinkles for the best visual impact.
Optional Enhancements
Consider these additions to customize your Funfetti Oreo icebox cake:
• Food coloring: Add extra color to your pudding layers • Vanilla extract: Enhance the overall flavor profile • Fresh berries: Provide natural sweetness and visual appeal • Chocolate chips: Add extra texture and chocolate flavor
Step-by-Step Guide to Making No-Bake Funfetti Oreo Icebox Cake
Creating this delicious dessert involves three simple phases. Moreover, each step builds upon the previous one for perfect results.
Step 1: Preparation and Pudding Creation
Start by gathering all your ingredients and tools. Additionally, ensure your whipped topping is completely thawed before beginning.
First, take a medium mixing bowl and combine the cold milk with instant vanilla pudding mix. Furthermore, whisk these ingredients together vigorously for about two minutes. The mixture should become smooth and noticeably thickened.
Next, allow the pudding to set for approximately five minutes. Meanwhile, this resting period ensures proper consistency. Additionally, the pudding will continue thickening during this time.
After the pudding has set, gently fold in half of the thawed whipped topping. Moreover, use a spatula to combine these ingredients with gentle motions. Furthermore, avoid overmixing to maintain the light, airy texture.
Step 2: Assembly Process for Your Icebox Cake
Now comes the fun part – assembling your no-bake Funfetti Oreo icebox cake! Additionally, this process creates the beautiful layers that make this dessert so appealing.
Begin by selecting a 9×9 inch square baking dish. Furthermore, ensure the dish is clean and dry before starting. Additionally, this size provides the perfect depth for your layers.
Spread a thin layer of your pudding mixture across the bottom of the dish. Moreover, this base layer prevents the cookies from sticking. Furthermore, use a spatula to create an even coating.
Next, arrange the Funfetti Oreo cookies in a single layer over the pudding. Additionally, break cookies as needed to fill any gaps. Moreover, aim for complete coverage without overlapping.
Then, spread half of your remaining pudding mixture over the cookie layer. Furthermore, work gently to avoid disturbing the cookies underneath. Additionally, ensure even distribution for consistent flavor.
Repeat this process by adding another layer of Funfetti Oreo cookies. Moreover, maintain the same careful arrangement as the first layer. Additionally, this creates the cake’s signature striped appearance.
Step 3: Final Assembly and Finishing Touches
Complete your no-bake Funfetti Oreo icebox cake with these final steps. Moreover, these finishing touches transform your dessert into a masterpiece.
Spread the remaining pudding mixture over your second cookie layer. Furthermore, use smooth, even strokes for the best appearance. Additionally, ensure complete coverage to the edges.
Top everything with your remaining whipped topping. Moreover, spread this final layer evenly across the entire surface. Furthermore, create gentle swirls for an attractive presentation.
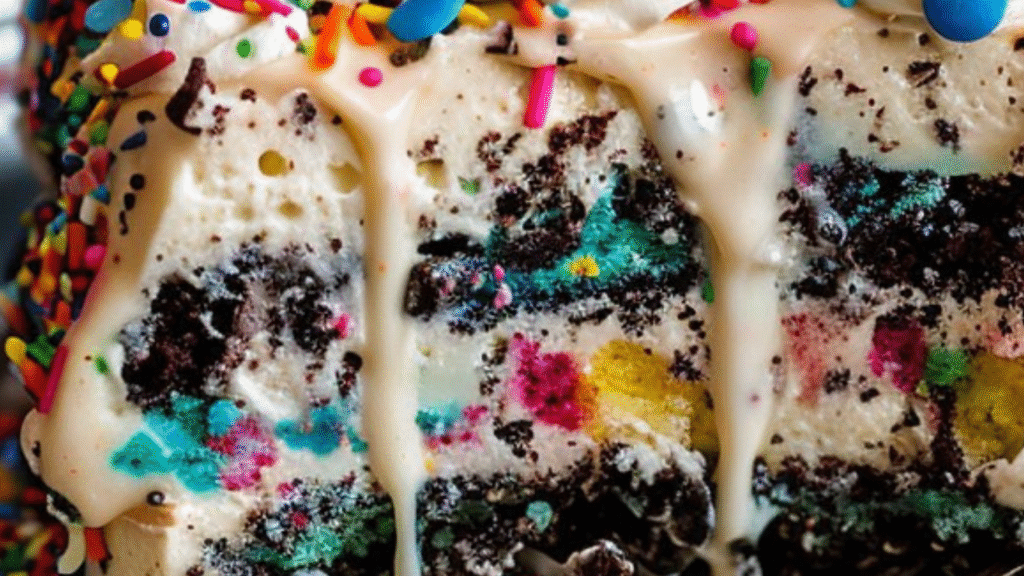
Finally, generously sprinkle colorful sprinkles over the entire top surface. Additionally, press them lightly into the whipped topping to help them adhere. Moreover, this adds the signature funfetti appearance.
Cover your completed cake tightly with plastic wrap. Furthermore, ensure the wrap doesn’t touch the surface to preserve the beautiful topping. Additionally, refrigerate for at least four hours, though overnight is even better.
Pro Tips for the Perfect Funfetti Oreo Icebox Cake
These expert suggestions will help you achieve bakery-quality results. Moreover, following these tips ensures success every time.
Timing and Temperature Considerations
Chill Time is Crucial: Your no-bake Funfetti Oreo icebox cake needs adequate setting time. Additionally, longer chilling periods improve both texture and flavor. Moreover, overnight refrigeration produces the best results.
Ingredient Temperature Matters: Use cold milk for the pudding mixture. Furthermore, ensure your whipped topping is properly thawed but still cool. Additionally, room temperature ingredients can affect the final texture.
Assembly Techniques
Layer Thickness: Keep your layers relatively thin and even. Moreover, this creates better structural integrity. Additionally, even layers ensure consistent flavor in every bite.
Cookie Placement: Don’t worry about perfect cookie alignment. Furthermore, broken pieces actually help fill gaps effectively. Additionally, slight imperfections add to the homemade charm.
Storage and Serving Suggestions
Proper Storage: Always keep your icebox cake covered and refrigerated. Moreover, it stays fresh for up to three days. Additionally, the flavors actually improve over time.
Serving Preparation: Use a sharp knife dipped in warm water for clean cuts. Furthermore, wipe the blade between cuts for neat presentation. Additionally, serve chilled for the best texture.
Creative Variations of Funfetti Oreo Icebox Cake
Transform your basic recipe with these exciting variations. Moreover, these adaptations allow you to customize for different occasions and preferences.
Flavor Combinations
Chocolate Lovers Version: Replace vanilla pudding with chocolate pudding mix. Additionally, use regular Oreos instead of Funfetti variety. Moreover, top with chocolate sprinkles for extra indulgence.
Strawberry Funfetti Cake: Add strawberry pudding mix and fresh strawberry slices. Furthermore, use pink and white sprinkles for a feminine touch. Additionally, this variation is perfect for spring celebrations.
Peanut Butter Twist: Incorporate peanut butter cookies and peanut butter pudding. Moreover, add chopped peanuts for extra crunch. Additionally, this creates a rich, nutty flavor profile.
Seasonal Adaptations
Holiday Themed: Use red and green sprinkles for Christmas. Additionally, consider adding peppermint extract to the pudding. Moreover, crushed candy canes make an excellent topping.
Birthday Special: Add extra colorful sprinkles and birthday cake flavoring. Furthermore, consider using birthday cake Oreos if available. Additionally, top with candles for a festive presentation.
Troubleshooting Common Issues with No-Bake Icebox Cakes
Even simple recipes sometimes present challenges. However, these solutions will help you overcome common problems.
Texture Problems
Runny Pudding: This usually indicates insufficient whisking or warm milk. Moreover, ensure you whisk for the full two minutes. Additionally, always use cold milk for best results.
Soggy Cookies: This happens when the cake sits too long before serving. Furthermore, assemble no more than 24 hours ahead. Additionally, ensure proper covering to prevent moisture buildup.
Assembly Issues
Uneven Layers: Take your time during assembly for best results. Moreover, use a spatula to spread ingredients evenly. Additionally, don’t rush the layering process.
Sliding Layers: This occurs when layers are too thick or ingredients too warm. Furthermore, thinner layers provide better stability. Additionally, ensure all ingredients are properly chilled.
Nutritional Information and Dietary Considerations
Understanding your dessert’s nutritional profile helps with meal planning. Moreover, this information assists those with specific dietary needs.
Basic Nutritional Facts
Each serving of no-bake Funfetti Oreo icebox cake contains approximately 300 calories. Additionally, this assumes the recipe serves 9 people. Moreover, actual calories may vary based on specific brands used.
The cake provides a moderate amount of calcium from the milk and pudding. Furthermore, it contains carbohydrates primarily from cookies and sugars. Additionally, fat content comes mainly from the cookies and whipped topping.
Dietary Modifications
Lower Calorie Version: Use sugar-free pudding mix and light whipped topping. Additionally, consider reducing the cookie layers slightly. Moreover, serve smaller portions to reduce calorie intake.
Gluten-Free Alternative: Substitute gluten-free chocolate sandwich cookies. Furthermore, ensure your pudding mix is certified gluten-free. Additionally, check all ingredient labels carefully.
FAQs About No-Bake Funfetti Oreo Icebox Cake
Q: Can I use regular Oreo cookies instead of Funfetti Oreos?
A: Absolutely! Regular Oreos work perfectly as a substitute. However, you’ll lose some of the signature funfetti flavor and colorful appearance. Additionally, consider adding extra sprinkles to maintain the festive look. Moreover, the texture and assembly process remain exactly the same.
Q: How long does this icebox cake need to set?
A: Your no-bake Funfetti Oreo icebox cake requires a minimum of four hours to set properly. However, overnight chilling produces superior results. Additionally, the cookies soften perfectly during this time. Moreover, longer setting times actually improve the overall flavor and texture.
Q: Can I make this cake ahead of time?
A: Yes! This dessert actually improves when made in advance. Furthermore, it stays fresh in the refrigerator for up to three days. Additionally, the flavors meld beautifully over time. Moreover, this makes it perfect for party planning and busy schedules.
Q: What size pan should I use for this recipe?
A: A 9×9 inch square baking dish works perfectly for this recipe. However, you can also use a similar-sized rectangular dish. Additionally, deeper dishes may require longer setting times. Moreover, ensure your chosen dish holds at least 2 quarts.
Q: Can I freeze this icebox cake?
A: While possible, freezing isn’t recommended for optimal texture. However, if you must freeze it, wrap tightly and use within one month. Additionally, thaw completely in the refrigerator before serving. Moreover, the texture may become slightly different after freezing.
Q: How do I prevent the layers from mixing together?
A: Allow each layer to set briefly before adding the next one. Furthermore, work gently when spreading ingredients. Additionally, avoid pressing too hard on the cookies. Moreover, proper chilling time helps maintain distinct layers.
Q: What’s the best way to cut and serve this cake?
A: Use a sharp knife dipped in warm water for clean cuts. Furthermore, wipe the blade between cuts to maintain neat presentation. Additionally, serve immediately after cutting for best appearance. Moreover, chilled serving plates help maintain the cake’s shape.
Storage and Serving Suggestions for Your Icebox Cake
Proper storage ensures your no-bake Funfetti Oreo icebox cake maintains its quality and flavor. Moreover, following these guidelines maximizes your dessert’s lifespan.
Optimal Storage Conditions
Keep your icebox cake covered and refrigerated at all times. Furthermore, plastic wrap works well for short-term storage. Additionally, consider using airtight containers for longer storage periods. Moreover, proper covering prevents the cake from absorbing refrigerator odors.
Store your cake away from strong-smelling foods in the refrigerator. Additionally, place it on a stable shelf to prevent damage. Moreover, avoid storing near the refrigerator door where temperatures fluctuate.
Serving Recommendations
Serve your no-bake Funfetti Oreo icebox cake directly from the refrigerator. Furthermore, cold temperatures provide the best texture and flavor. Additionally, allow guests to see the beautiful layers by cutting clean slices.
Consider garnishing individual servings with extra sprinkles. Moreover, a dollop of whipped cream adds elegance. Additionally, fresh berries provide color contrast and complementary flavors.
Perfect Occasions for Funfetti Oreo Icebox Cake
This versatile dessert suits numerous celebrations and gatherings. Moreover, its festive appearance makes it perfect for special occasions.
Birthday Celebrations
The colorful sprinkles and fun flavors make this cake ideal for birthday parties. Additionally, children especially love the familiar Oreo taste combined with funfetti elements. Moreover, the no-bake aspect means you can focus on other party preparations.
Holiday Gatherings
Customize the sprinkle colors to match any holiday theme. Furthermore, the make-ahead nature helps with holiday meal planning. Additionally, this dessert provides a lighter alternative to traditional heavy holiday sweets.
Potluck Events
This cake travels well and serves a crowd easily. Moreover, its unique appearance always generates compliments and recipe requests. Additionally, the simple ingredient list makes it budget-friendly for potluck contributions.
Conclusion
The no-bake Funfetti Oreo icebox cake represents the perfect combination of simplicity and sophistication. Moreover, this delightful dessert proves that impressive treats don’t require complex techniques or extensive baking experience. Additionally, its colorful appearance and beloved flavors make it a guaranteed crowd-pleaser.
Furthermore, the recipe’s flexibility allows for countless variations and customizations. Additionally, the make-ahead nature makes it perfect for busy schedules and party planning. Moreover, both children and adults will fall in love with its nostalgic flavors and beautiful presentation.
Print
The Ultimate No-Bake Funfetti Oreo Icebox Cake Recipe: Sweet, Simple, and Spectacular
- Total Time: 15 minutes
Description
Indulge in the joy of this no-bake Funfetti Oreo icebox cake that promises layers of creamy goodness and a burst of funfetti flavor!
Ingredients
1 package (14.3 oz) Funfetti Oreo cookies
2 cups cold milk
1 package (3.4 oz) instant vanilla pudding mix
1 container (8 oz) frozen whipped topping, thawed
Sprinkles for garnish
Instructions
In a medium bowl, whisk together cold milk and instant vanilla pudding mix until smooth and thickened.
Fold in half of the whipped topping until well combined.
In a 9×9 inch square baking dish, spread a thin layer of the pudding mixture on the bottom.
Arrange a layer of Funfetti Oreo cookies evenly over the pudding mixture, breaking them if needed to fit.
Spread half of the remaining pudding mixture over the cookies.
Repeat with another layer of Funfetti Oreo cookies and the remaining pudding mixture.
Top with the remaining whipped topping, spreading evenly to cover.
Garnish with sprinkles over the top.
Cover with plastic wrap and refrigerate for at least 4 hours or overnight until set.
Prep Time: 15 minutes
Kcal: Approximately 300 per serving
- Prep Time: 15 mins