Picture this: layers of rich chocolate cake paired with creamy peanut butter frosting, topped with everyone’s favorite candy. Moreover, this Reese’s cake combines two beloved flavors into one show-stopping dessert that will have your guests begging for the recipe.
Additionally, whether you’re celebrating a birthday, hosting a dinner party, or simply craving something indulgent, this cake delivers pure chocolate-peanut butter bliss. Furthermore, the combination of moist chocolate layers and silky peanut butter frosting creates a texture contrast that’s absolutely divine.
Print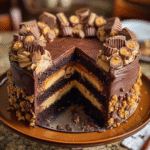
The Ultimate Reese’s Cake Recipe: A Decadent Chocolate and Peanut Butter Masterpiece
- Total Time: 1 hour 35 mins
- Yield: 12–16 servings 1x
- Diet: Vegetarian
Description
This Reese’s Cake is a dream come true for chocolate and peanut butter lovers! Moist layers of rich chocolate cake are stacked with creamy peanut butter frosting and topped with plenty of chopped Reese’s cups for the ultimate indulgent dessert.
Ingredients
For the chocolate cake:
- 2 cups all-purpose flour
- 2 cups granulated sugar
- 3/4 cup unsweetened cocoa powder
- 2 tsp baking powder
- 1 1/2 tsp baking soda
- 1 tsp salt
- 2 large eggs
- 1 cup whole milk
- 1/2 cup vegetable oil
- 2 tsp vanilla extract
- 1 cup boiling water
For the peanut butter frosting:
- 1 cup unsalted butter, softened
- 1 cup creamy peanut butter
- 4 cups powdered sugar
- 1/4 cup heavy cream
- 1 tsp vanilla extract
For the decoration:
- 12–16 Reese’s peanut butter cups, chopped or whole
- Chocolate sauce or ganache (optional)
Instructions
- Preheat and prep pans: Preheat oven to 350°F (175°C). Grease and flour two 9-inch round cake pans or line with parchment paper.
- Make the cake batter: In a large bowl, sift together flour, sugar, cocoa powder, baking powder, baking soda, and salt. Add eggs, milk, oil, and vanilla. Beat for 2 minutes, then stir in boiling water (batter will be thin).
- Bake: Pour batter evenly into pans and bake for 30–35 minutes, or until a toothpick inserted in the center comes out clean. Let cool in pans for 10 minutes, then transfer to wire racks to cool completely.
- Make the frosting: Beat softened butter and peanut butter until smooth. Gradually add powdered sugar, alternating with heavy cream and vanilla. Beat until creamy and fluffy.
- Assemble the cake: Place one cake layer on a serving plate. Spread with peanut butter frosting. Top with second cake layer and frost the top and sides evenly.
- Decorate: Garnish with chopped or whole Reese’s peanut butter cups. Optional: drizzle with chocolate sauce or ganache.
- Chill and serve: Refrigerate for at least 30 minutes before slicing and serving.
Notes
- Make-ahead: Cake layers can be made up to 2 days in advance and stored at room temperature.
- Storage: Keep leftovers covered in the fridge for up to 3 days. Bring to room temperature before serving.
- Variations: Add a chocolate ganache drip or crushed pretzels for extra flair.
- Prep Time: 1 hour
- Cook Time: 35 mins
- Category: Dessert
- Method: Baking
- Cuisine: American
Nutrition
- Serving Size: 1 slice
- Calories: 600 kcal
- Sugar: 55 g
- Sodium: 350 mg
- Fat: 36 g
- Saturated Fat: undefined
- Unsaturated Fat: undefined
- Trans Fat: undefined
- Carbohydrates: 68 g
- Fiber: 3 g
- Protein: 7 g
- Cholesterol: 80 mg
Keywords: Reese’s cake, chocolate peanut butter cake, birthday cake, peanut butter frosting, layered cake
Why You’ll Love This Reese’s Cake Recipe
This chocolate peanut butter cake offers everything you could want in a dessert. Here’s why it’s destined to become your go-to recipe:
• It’s beginner-friendly: The straightforward instructions make this cake accessible to new bakers. Additionally, the ingredients are common pantry staples that you likely already have on hand.
• It’s incredibly versatile: You can customize the decoration with different Reese’s products or add your own creative touches. Moreover, the recipe works beautifully for cupcakes if you prefer individual servings.
• It’s a guaranteed crowd-pleaser: The chocolate and peanut butter combination appeals to almost everyone. Furthermore, the impressive presentation makes it perfect for special occasions.
• It stores well: This cake actually improves in flavor after a day, making it ideal for advance preparation. Plus, it keeps fresh in the refrigerator for up to three days.
• It’s cost-effective: Despite its gourmet appearance, this Reese’s cake costs significantly less than bakery alternatives. Additionally, one recipe serves 12-16 people generously.
Essential Ingredients for the Perfect Reese’s Cake
Creating this masterpiece requires quality ingredients that work together harmoniously. Let’s explore what makes this recipe so special.
Chocolate Cake Components
The foundation of any great Reese’s cake starts with a moist, rich chocolate base. Therefore, selecting the right ingredients is crucial for achieving that perfect texture and flavor.
Cocoa powder serves as the primary chocolate flavor source. Moreover, using unsweetened cocoa allows you to control the sweetness level perfectly. Additionally, high-quality cocoa powder creates a deeper, more complex chocolate taste.
All-purpose flour provides the cake’s structure without making it too dense. However, be careful not to overmix, as this can result in a tough texture. Furthermore, measuring flour correctly ensures consistent results every time.
Granulated sugar not only sweetens but also helps create the cake’s tender crumb. Additionally, sugar helps retain moisture, keeping your Reese’s cake fresh longer.
Peanut Butter Frosting Essentials
The frosting is where this recipe truly shines. Moreover, the combination of butter and peanut butter creates an incredibly smooth, pipeable consistency.
Creamy peanut butter works best for frosting because it blends smoothly without chunks. However, if you prefer texture, you can substitute chunky peanut butter for added interest. Additionally, room temperature peanut butter incorporates more easily with other ingredients.
Powdered sugar creates the frosting’s structure while providing sweetness. Furthermore, sifting the powdered sugar prevents lumps and ensures a silky-smooth finish.
Heavy cream adds richness and helps achieve the perfect consistency. Moreover, you can adjust the amount slightly to reach your preferred frosting thickness.
Step-by-Step Guide to Reese’s Cake Perfection
Creating this show-stopping dessert involves several key stages. However, following these detailed steps ensures success every time.
Step 1: Preparation and Setup
Proper preparation sets the foundation for baking success. Therefore, gathering all ingredients and tools before starting prevents mistakes and ensures smooth execution.
First, preheat your oven to 350°F (175°C). Additionally, this temperature provides even baking without overcooking the edges. Moreover, a properly preheated oven ensures consistent results.
Next, prepare your cake pans by greasing and flouring them thoroughly. Alternatively, parchment paper circles provide foolproof release. Furthermore, proper pan preparation prevents sticking and ensures clean removal.
Meanwhile, measure all ingredients accurately using kitchen scales when possible. Additionally, bring eggs and milk to room temperature for better incorporation. Moreover, room temperature ingredients blend more easily and create a smoother batter.
Step 2: Creating the Chocolate Cake Batter
The mixing process requires attention to detail for optimal results. However, the technique is straightforward once you understand the basics.
Begin by sifting together all dry ingredients in a large bowl. Moreover, sifting removes lumps and aerates the flour for a lighter texture. Additionally, this step ensures even distribution of leavening agents.
Subsequently, add wet ingredients to the dry mixture. Furthermore, beat on medium speed for exactly two minutes to develop proper structure. However, avoid overmixing, which can create a tough cake.
Finally, stir in the boiling water gradually. Although this creates a thin batter, don’t worry – this is normal and results in incredibly moist cake layers. Moreover, the hot water helps bloom the cocoa powder for richer flavor.
Step 3: Baking the Perfect Reese’s Cake Layers
Proper baking technique determines your cake’s final texture and flavor. Therefore, monitoring closely during the baking process ensures optimal results.
Divide the batter evenly between prepared pans. Additionally, gently tap pans on the counter to release air bubbles. Moreover, this prevents uneven rising and creates level layers.
Bake for 30-35 minutes, rotating pans halfway through for even browning. Furthermore, avoid opening the oven door frequently, as this causes temperature fluctuations. Additionally, the cakes are done when a toothpick inserted in the center comes out clean.
Cool cakes in pans for 10 minutes before turning out onto wire racks. Moreover, this prevents breaking while allowing proper cooling. Additionally, completely cooled cakes are essential before frosting to prevent melting.
Step 4: Crafting the Peanut Butter Frosting
Creating silky smooth frosting requires proper technique and patience. However, the results are worth the extra attention to detail.
Start by creaming softened butter and peanut butter until light and fluffy. Additionally, this process incorporates air for better texture. Moreover, properly creamed fats create a stable base for the frosting.
Gradually alternate adding powdered sugar and cream. Furthermore, this prevents the mixture from becoming too thick or thin. Additionally, beat well after each addition for optimal consistency.
Finally, add vanilla extract and beat until completely smooth. Moreover, taste and adjust sweetness if needed. Additionally, the finished frosting should hold its shape while remaining spreadable.

Pro Tips for the Best Reese’s Cake Results
Achieving bakery-quality results at home requires attention to small details. Moreover, these professional tips elevate your cake from good to extraordinary.
Temperature Control Secrets
Room temperature ingredients blend more easily and create better texture. Therefore, remove eggs, milk, and butter from refrigeration 1-2 hours before baking. Additionally, cold ingredients can cause the batter to curdle or separate.
Furthermore, avoid overbaking by checking doneness early. Moreover, cakes continue cooking slightly after removal from the oven. Additionally, slightly underbaked is better than overbaked for moisture retention.
Assembly Techniques for Success
Level cake layers using a serrated knife for professional appearance. Additionally, even layers ensure stable stacking and attractive presentation. Moreover, removing domed tops creates clean, straight edges.
Apply a thin crumb coat before final frosting. Furthermore, this seals loose crumbs and creates a smooth base. Additionally, chilling between coats makes final decoration easier.
Creative Variations for Your Reese’s Cake
This versatile recipe adapts beautifully to different preferences and occasions. Moreover, these variations maintain the core chocolate-peanut butter appeal while adding unique twists.
Cupcake Conversion
Transform this recipe into individual treats by using cupcake pans. Additionally, reduce baking time to 18-22 minutes for perfectly moist cupcakes. Moreover, individual servings make portion control easier and presentation more elegant.
Furthermore, cupcakes are ideal for parties and gatherings. Additionally, they’re easier to serve and require no cutting. Moreover, you can vary toppings on individual cupcakes for different preferences.
Gluten-Free Adaptations
Substitute gluten-free flour blend for traditional all-purpose flour. Additionally, ensure your blend contains xanthan gum for proper structure. Moreover, gluten-free versions can be just as delicious with proper ingredient selection.
Furthermore, check that all other ingredients are certified gluten-free. Additionally, cross-contamination prevention is crucial for those with celiac disease. Moreover, dedicated gluten-free baking tools help ensure safety.
Troubleshooting Common Reese’s Cake Issues
Even experienced bakers encounter challenges occasionally. However, understanding common problems and solutions prevents disappointment and ensures success.
Dense or Heavy Cake Texture
Overmixing develops too much gluten, creating tough texture. Therefore, mix just until ingredients combine. Additionally, measure flour accurately using the spoon-and-level method. Moreover, expired leavening agents can prevent proper rising.
Furthermore, ensure ingredients are at proper temperature before mixing. Additionally, cold ingredients don’t incorporate well and can cause dense results. Moreover, oven temperature accuracy affects final texture significantly.
Frosting Consistency Problems
Frosting that’s too thick needs additional cream or milk. Additionally, add liquid gradually to avoid over-thinning. Moreover, frosting that’s too thin may need more powdered sugar or chilling time.
Furthermore, ensure butter and peanut butter are properly softened before creaming. Additionally, overbeaten frosting can become grainy and separate. Moreover, room temperature frosting spreads more easily than cold.
Storage and Make-Ahead Tips for Reese’s Cake
Proper storage maintains freshness and flavor for several days. Moreover, this cake actually improves in taste after the flavors meld overnight.
Short-Term Storage Solutions
Store completed cake covered in the refrigerator for up to three days. Additionally, bring to room temperature 30 minutes before serving for best texture. Moreover, plastic wrap directly on cut surfaces prevents drying.
Furthermore, individual slices can be wrapped and frozen for quick treats. Additionally, frozen cake thaws quickly at room temperature. Moreover, pre-sliced portions make serving convenient for busy schedules.
Make-Ahead Strategies
Cake layers can be baked and frozen up to one month ahead. Additionally, wrap cooled layers tightly in plastic wrap and foil. Moreover, frozen layers actually become more moist during thawing.
Furthermore, frosting can be made several days ahead and refrigerated. Additionally, bring to room temperature and rewhip before using. Moreover, advance preparation reduces stress for special occasions.
Nutritional Considerations for Reese’s Cake
Understanding the nutritional content helps with portion planning and dietary considerations. Moreover, this information allows for informed decision-making about serving sizes.
Each generous slice contains approximately 600 calories. Additionally, the cake provides protein from eggs and peanut butter. Moreover, moderate portions allow enjoyment without excessive guilt.
Furthermore, you can reduce calories by using sugar substitutes in the frosting. Additionally, smaller serving sizes still provide satisfying flavor. Moreover, sharing slices makes indulgence more reasonable.
FAQs About Reese’s Cake
Q: Can I make this Reese’s cake layers ahead of time?
A: Absolutely! Moreover, cake layers actually freeze beautifully for up to one month. Additionally, wrap cooled layers tightly in plastic wrap and aluminum foil. Furthermore, frozen layers often become more moist during the thawing process.
Q: How should I store leftover Reese’s cake?
A: Store covered in the refrigerator for up to three days. Additionally, bring to room temperature 30 minutes before serving for optimal taste and texture. Moreover, the flavors actually improve after the first day as they meld together.
Q: Can I use natural peanut butter instead of regular?
A: Natural peanut butter works, but the texture may differ slightly. Additionally, ensure it’s well-stirred and at room temperature. Moreover, you might need to adjust the powdered sugar amount for proper consistency.
Q: What’s the best way to get smooth frosting?
A: Ensure all ingredients are at room temperature before mixing. Additionally, cream the butter and peanut butter thoroughly before adding other ingredients. Moreover, sift the powdered sugar to prevent lumps.
Q: Can I make this recipe into cupcakes?
A: Yes! Additionally, fill cupcake liners 2/3 full and bake for 18-22 minutes. Moreover, this recipe yields approximately 24 standard cupcakes. Furthermore, cupcakes are perfect for parties and individual servings.
Q: How do I prevent the cake from sticking to the pan?
A: Grease pans thoroughly and dust with cocoa powder instead of flour. Additionally, parchment paper circles provide foolproof release. Moreover, allow cakes to cool 10 minutes before removing from pans.
Q: Can I reduce the sugar in this recipe?
A: You can reduce sugar slightly, but it affects texture and moisture. Additionally, sugar helps create tender crumb and preserve freshness. Moreover, consider reducing frosting sweetness instead of cake sugar.
Q: What if my frosting is too thin?
A: Add more powdered sugar gradually until desired consistency is reached. Additionally, chilling the frosting for 30 minutes can help it firm up. Moreover, ensure your butter wasn’t too warm when mixing.
Conclusion: Your Journey to Reese’s Cake Mastery
This Reese’s cake recipe combines beloved flavors into one unforgettable dessert experience. Moreover, the detailed instructions and professional tips ensure success for bakers of all skill levels. Additionally, the versatility allows for creative adaptations while maintaining the core appeal.
Furthermore, the make-ahead options and storage tips make this cake perfect for entertaining and special occasions. Additionally, understanding common troubleshooting solutions prevents frustration and ensures consistent results.